
Accessing a PC or server remotely while the machine is switched on is easy. Many free and paid applications can do it: TeamViewer, , AnyDesk, , Chrome Remote Desktop, or my favourite on Windows, Remote Desktop, Microsoft’s native application included only in the Pro or Education editions of its operating system.
The problem appears when you want to connect from outside your home but do not want to keep the computer running 24 hours a day just in case you need access.
This is exactly my situation: I want to be able to access my home work computer now that I am going on holiday, but I do not want to leave it on all the time.
That way I can travel with my Chromebook or with any tablet without giving up more demanding work than these devices can handle on their own..
So, if you are like me and:
- prefer working on a desktop computer,
- go on holiday from time to time,
- and want to work in much the same way from a lighter device,
the solution I suggest—or one of the alternatives I also cover—can make your life easier.
But:
- If you normally work with a laptop.
- With a Mac Mini (or another low-power mini PC that you can leave plugged in day and night without any problem).
- You do not need to access your home or office PC.
- Or you never go on holiday.
In those cases, this article is NOT for you.
With that cleared up, if you work with ordinary desktop computers (Linux or Windows), I will explain a little more about what we are going to do.
The first thing to understand is that you need to split the system into two or three parts:
- Turn on the computer from outside your home.
- Connect to it once Windows has started.
- View the computer’s desktop.
The last two points can be combined or kept separate depending on the route you choose; I will explain that later.
I should also warn you that the process is not complicated, but it does require some imaginative solutions, because the alternatives are usually more complex.
Before explaining the system, let us look at what you will need.
Índice de Contenidos del Artículo
- What you need to set up the system
- The process in three parts
- Recommended setup
- Performance: does it work well in Full HD?
- Shutting down correctly
- Common problems
- Conclusions
- Frequently asked questions
- How can I switch on my PC from outside my home?
- What is the simplest setup for accessing a PC remotely?
- Do I need Windows Pro to connect to the computer?
- Which option provides better quality: RDP or Chrome Remote Desktop?
- Can I access the PC from a Chromebook, tablet or phone?
- Is it safe to open the Remote Desktop port on the router?
- Why does my Windows PIN not work when connecting through RDP?
- Can I shut down the computer by cutting power with the smart plug?
- What happens if the computer goes to sleep?
- Can I work remotely in Full HD?
What you need to set up the system
At a minimum, you will need:
- The PC with an internet connection that you want to access.
- The device (Chromebook, tablet, laptop or phone) with an internet connection from which you want to access the PC.
- A system for starting the PC at home while it is switched off, which can be one of the following:
- A router with Wake-on-LAN functionality for a network device and an app that lets you access it from outside. This is not common.
- A Raspberry Pi, an old phone or another PC at home. In every case, it must remain switched on and connected to the network.
- A smart plug with an app that lets you access it from outside your home.
- A remote-access application (AnyDesk, TeamViewer, Remote Desktop, Chrome Remote Desktop or similar). Preferably a free one.
Additionally, and only if you choose Windows Remote Desktop:
- Windows Pro installed on the PC you want to access.
- A Windows account with a password.
- One of these three options:
Although it may look rather complicated when written out, the system can actually be very, very simple—for example, with this basic combination:
Smart plug + Chrome Remote Desktop.
It can also become more complicated, depending on your needs, of course. For example:
Raspberry Pi + TeamViewer + DynDNS + port forwarding on the router + Windows Remote Desktop.
In the first case, everything is operational in five minutes. The second will take a couple of hours.
In the first case, image quality is acceptable but not excellent. In the second, you will often forget that you are working remotely thanks to the excellent image quality and how smoothly everything runs.
Let us go through the steps and the alternatives at each stage.
The process in three parts
Now that we know what we need, I want you to understand what we will do at each stage so that you can choose the route that best fits your situation. At every point I will explain the option I choose and why, while also discussing the alternatives available to you.
#1. Turn on the PC only when you need it: the imaginative solution
The reason needs little explanation: ordinary desktop PCs consume power even in sleep mode. If you leave one running 24/7, you use more electricity and shorten the life of your equipment.
For both reasons, I prefer not to do that with my personal computers. Company servers are different: they are usually designed for it and do not normally cause problems.
What you need, then, is a system that turns it on when you are not at home and cannot physically press the button.
Option 1: Wake-on-LAN, the usual—and hardest—route
If you work with systems, this may be the first thing that came to mind.
The Wake-on-LAN (WoL) function lets you switch on a computer by sending a special packet to its network card.
Inside your home it is fairly simple, but doing it from outside, on another network, can become quite complicated.
The usual solution is to leave another device switched on at home:
- Raspberry Pi.
- NAS.
- Mini PC.
- Another computer.
- Compatible router.
- Even an old Android phone.
From outside, you connect to that device using TeamViewer and tell it to switch on the PC you want to access.
In my opinion, this is the simplest route, because all it requires is creating an account, installing the app and linking the three devices: the PC you want to access, the device you will connect from, and the Raspberry Pi or phone that remains switched on.
Other routes, such as SSH, AnyDesk or a VPN, do the same thing: connect to the always-on device that sends the WoL packet.
If you already have a Raspberry Pi or NAS, this may be the best option, because you do not need to buy anything.
If you need to get a device solely to send the packet, there are cheaper and much simpler solutions.
Wake-on-LAN from the router
If you have a good router, pay attention to this.
Some routers can send Wake-on-LAN packets from their web administration panel or app.
In theory it is the perfect solution because it requires no other device. In practice, it depends on the router and the features offered by its management app.
I can already tell you that not all of them let you do it directly —most do not—and those that do, usually only allow it while you are connected to their network, not over the Internet.
Option 2: Smart plug—the simplest option
This is the imaginative solution I mentioned earlier.
Also, it is the cheapest solution if you do not have any device permanently switched on at home.
It consists of buying a smart plug like this one (this is the one I bought).
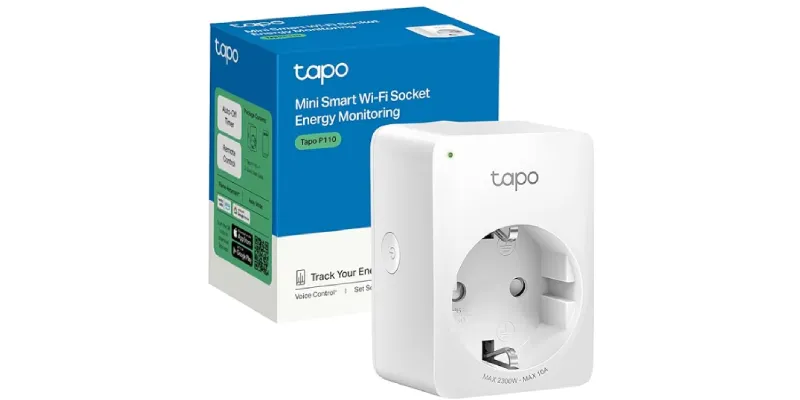
Once you have it, connect the PC you want to access to the smart plug, install the manufacturer’s app and link the device to your Wi-Fi. The whole process takes less than two minutes.
The smart plug does not physically press the computer’s power button. What it does is cut and restore the power. We are going to use precisely this feature to switch on the PC whenever we want.
To do that, enter the BIOS of the computer by pressing a key during startup—usually F2, F10, Delete or Esc, depending on the manufacturer.
Once inside, tell it that the PC should start automatically when it detects that electrical power has returned.
The option may be called:
- After Power Loss.
- Restore on AC Power Loss.
- AC Power Recovery.
- Power On After Power Failure.
- State After Power Loss.
Or something similar.
Inside, you can choose one of these three options:
- Power Off: the computer remains switched off when power returns.
- Power On: the computer switches on automatically.
- Previous State: restores the state from before the power cut.
For this setup you must choose Power On.
Once you have changed the BIOS setting, save and exit.
From this point on, whenever you want to switch on the PC while you are away from home, all you need to do is:
- Open the smart-plug app.
- Turn off the power output.
- Wait five to ten seconds.
- Turn it back on.
- The BIOS detects that power has returned and starts the PC.
This option is very common in all kinds of BIOS, but make sure your PC supports it before buying the plug.
How to check that startup after a power loss works before buying the plug
Run a manual test:
- Shut down Windows normally.
- Wait until the computer is completely switched off.
- Disconnect the power cable.
- Wait about ten seconds.
- Reconnect it.
If the computer switches on by itself, the BIOS is configured correctly.
If it does not start, return to the BIOS and check that you selected Power On.
Tips
The initial power cut is necessary because, if the plug was already on, pressing “on” again produces no electrical change.
A smart plug like the one I recommend, with energy monitoring, offers an additional advantage: you can check remotely whether the computer is off, starting up or running.
This matters because the plug should mainly be used to switch the computer on, not to shut it down abruptly. When you finish working, you should shut down Windows using the normal controls on the PC you are accessing.
That is why energy monitoring is not essential, but it helps when remote access takes a while to appear.
#2. Connect to the PC from outside the network
With either of the two methods above, we can now switch on the PC while you are away from home. The next step is connecting to it.
For that, you need two things:
- Prepare Windows.
- A tool such as one of these:
- Windows Remote Desktop (RDP).
- Chrome Remote Desktop, AnyDesk or TeamViewer.
I separate them into two groups because if you choose Windows Remote Desktop, you also need a way to reach the PC from the Internet.
We will shortly see that you can do this using NordVPN Meshnet, Tailscale or by opening ports on the router.
The other apps do not require this extra step, but in return their performance is usually worse, with higher latency or lower quality.
In any case, you need to do several things in Windows before you can access the computer.
2.1 Prepare Windows for remote access
Configure the computer as follows so that it remains available after startup.
Prevent it from going to sleep
The screen can turn off, but the PC should not go to sleep while you want it to remain accessible.
In Windows 11, go to:
Settings > System > Power & battery > Screen and sleep.Set sleep to Never when the computer is plugged in, or choose a sufficiently long period.
If Windows goes to sleep, the plug will remain on, but the remote-access applications may stop responding.
This is necessary regardless of the connection app you choose. The following is only required if you choose Microsoft Remote Desktop.
Windows settings for using Microsoft Remote Desktop (RDP)
If you choose this app, you will need to configure a few more things.
Enable the Remote Desktop option
This option is available only in Windows Pro and Education editions, not Windows Home.
To enable it, go to:
Settings > System > Remote DesktopThen restart the computer.
Check that you have a real user password
It is important to distinguish between:
- The Windows Hello PIN.
- The Windows account password.
- The Microsoft account email address.
- The PC user name.
For RDP you need:
- The user account on the PC that you use to sign in, which may or may not be an Outlook account.
- The regular user password (the Hello PIN does not work) to connect through RDP.
Before relying on remote access:
- Press Windows + L.
- Open Sign-in options.
- Select the password icon.
- Check that you can sign in without using the PIN.
2.2 Choose the remote-connection method
Here you must decide whether to use Windows Remote Desktop or a tool that already includes the entire connection system.
Chrome Remote Desktop
This tool includes both of the following in a single application:
- Access to the computer.
- The route used to reach it over the Internet, which RDP does not provide.
The PC app communicates with Google’s infrastructure. On your phone, Chromebook or another computer, sign in with your Google account, choose the computer and enter a PIN.
It is very easy. You do not need any of the following:
- Windows Pro.
- Router port forwarding.
- Your public IP address.
- NordVPN Meshnet or Tailscale.
To configure it:
- Open the remote-access section of Chrome Remote Desktop on the PC.
- Download and install the app on the PC.
- Assign a name to the computer (optional).
- Create a PIN.
- Restart Windows.
- Install and open the Chrome Remote Desktop app on your phone and test the connection using the PIN you created.
Remember, this is the simplest option and it works in situations where the others may fail (such as the Windows login screen).
That is why it is my second favourite after RDP and my always-available plan B.
AnyDesk or TeamViewer
Conceptually, both work like Chrome Remote Desktop.
Each has its own protocol and infrastructure for locating the computer, getting through the router and transmitting the screen.
Therefore, neither requires Meshnet, Tailscale or open ports.
For AnyDesk to work when nobody is sitting in front of the PC, you need to enable unattended access, set a password and install the program in Windows.
The installed version can work outside the user session and remain available after a restart or sign-out, whereas the portable version has more limitations.
The basic process is:
1. Install AnyDesk on the PC.
2. Open Settings > Access.
3. Enable unattended access.
4. Set a password.
5. Note the computer’s ID or alias.
6. Install AnyDesk on the device you will connect from.
7. Enter the PC ID and password.
TeamViewer offers an equivalent option through its full client or TeamViewer Host, which is designed to keep a computer available without anyone having to accept the connection.
After linking the PC to your account, you can select it from the device list and connect.
Remote Desktop on Windows Pro
RDP provides the best image quality if you have Windows 11 Pro.
It opens a full Windows session and usually works very well for almost everything.
As I said earlier, at screen resolutions up to Full HD, it feels very similar to sitting in front of your PC.
However, it requires additional configuration that the following apps avoid.
Make RDP accessible from outside your home
To begin with, unlike the previous applications, here you need to “reach” your home PC before you can use RDP.
You have three options:
- NordVPN with Meshnet functionality.
- Tailscale: an app with a free plan.
- Open ports on the router.
Let us look at the advantages and disadvantages of each one.
Option 1: NordVPN Meshnet, my setup
I have a paid account with NordVPN, which adds Meshnet functionality.
It creates a private network between your devices. The PC and the devices from which you want to access it receive an internal Meshnet address and can communicate even when connected to different networks.
To use it with RDP, you need:
- NordVPN installed and enabled on both the PC and the access device.
- Meshnet enabled on both the PC and the access device.
- Remote-access permission granted in Meshnet.
- Remote Desktop enabled in Windows.
- NordVPN configured to start with Windows.
- The Windows Remote Desktop app (currently called “Windows App”) for your access device (for Windows or for Android)).
If you have NordVPN, this route is very easy.
Configuration on the PC:
Open NordVPN and go to Devices in Meshnet.
Enable Meshnet.
Then locate the phone, Chromebook or laptop you will use to connect. In its permissions, you must enable Remote access to your device.
You do not need to allow the other device to route all its traffic through your PC or give it full access to the local network. For RDP, remote-access permission is enough.
NordVPN will assign the PC an IP similar to 100.126.46.108.
That is the address you must enter in the RDP application.
Make sure NordVPN starts with Windows:
This setting is essential for a computer that you will switch on through a smart plug.
Inside NordVPN, enable Launch NordVPN when Windows starts.
You do not need to connect to a VPN server in another country. NordVPN’s traditional VPN and Meshnet are separate functions.
For this setup, you only need the application to launch when the computer starts and Meshnet to remain enabled.
How to test it:
- Restart the PC.
- Do not open NordVPN manually.
- Do not launch any application.
- Wait one or two minutes.
- Turn off Wi-Fi on your phone and use mobile data.
- Check that Meshnet is active on the phone.
- Connect by RDP to the PC’s Meshnet IP.
If it works after restarting without opening NordVPN manually, it should also work when the computer starts through the smart plug.
Configure the RDP connection:
In the Microsoft application, add a new PC:
- PC name: the PC’s Meshnet IP
- Account: the user account you use to access the PC
- Gateway: none
Example:
PC name: 100.126.46.108
User: pc-admin
When prompted, use the pc-admin password. Not the PIN, and not necessarily the Outlook email password (the account used to access your PC may or may not be an Outlook account).
The PC name shown in Windows does not need to be entered in the PC name field if you are already using the Meshnet IP. That name may form part of the user name, but the connection destination remains the Meshnet IP.
Option 2: Tailscale, a similar alternative
If you do not have NordVPN and want an application that does the same thing with a free plan, Tailscale can perform an equivalent function.
Install Tailscale on both the PC and the remote device. It creates a private network between them, allowing you to connect through RDP using the private IP assigned by Tailscale.
You need:
- Tailscale on the PC.
- Tailscale on the remote device.
- Remote Desktop enabled.
- RDP connection to the Tailscale IP.
Option 3: open ports on the router
If you do not want to access the PC through apps, the classic alternative is to make the router forward connections received from the Internet to the computer’s RDP port.
The setup would be:
Internet > home public IP > open port on the router > PC local IP > RDPTo do this, you will need to:
- Reserve a local IP address for the computer.
- Create a port-forwarding rule.
- Know your public IP address.
- Use DDNS if that IP changes.
- Check that your provider does not use CG-NAT.
- Keep Windows properly updated and protected.
Although it works, it is the option I recommend least. RDP is more exposed to the Internet, and you have more components to configure and monitor.
Changing the external port reduces some automated traffic, but it does not replace a private network. Meshnet or Tailscale let you access the PC without publishing RDP directly on the Internet.
The differences between the options are as follows:
| Method | Controls Windows | Creates the route over the Internet | Requires Meshnet or Tailscale |
| Windows RDP | Yes | No | Yes, unless you use another VPN or port forwarding |
| Chrome Remote Desktop | Yes | Yes | No |
| AnyDesk | Yes | Yes | No |
| TeamViewer | Yes | Yes | No |
#3. View the desktop
Once connected to the computer using one of the methods described, all you need to do is open the relevant tool. It will display your home PC’s desktop on the device you are working from.
For example:
- Open Chrome Remote Desktop on your phone.
- You will see that your home PC is switched on. Select it.
- The PC desktop opens on your phone, and you can work on it.
With Windows Remote Desktop, the process is the same once you have configured access through Meshnet, Tailscale or port forwarding.
Recommended setup
I use two configurations: a better plan A and a reasonable plan B.
The simplest one (plan B)
You only need this:
Smart plug + Chrome Remote Desktop.
You do not need Windows Pro, Meshnet, Tailscale or any router changes.
It is the best option if you want to keep configuration to a minimum or will mainly connect from a Chromebook or phone.
You will probably experience some lag, though. Try it and see how tolerable it is for you.
The better option (my plan A): Remote Desktop on Windows Pro
Here you need:
Smart plug + Windows Remote Desktop + NordVPN Meshnet
Here, the image quality at Full HD is outstanding provided the internet connection of the device you are connecting from is reasonable. That is why it is my default way of working.
And I know this setup inside out: when I worked at Yo pongo el hielo, my powerful computer was at the office, and when I worked from home I used a laptop connected to that PC in this way.
I spent about three years working like this after trying the other options, which is why it is the one I recommend.
That said, as you have seen, it takes a little longer to configure than the previous option, and you need a Pro edition of Windows.
By the way, Tailscale can replace Meshnet in this setup without any problem.
Alternatives
If you already have a Raspberry Pi, NAS or mini PC and do not want to buy a smart plug:
Wake-on-LAN + remote-access tool
I have also tried this with a Raspberry Pi Zero 2 connected over Wi-Fi and left permanently on.
It works well, but you must add the extra layer of configuring TeamViewer on the Raspberry Pi so it can switch on the PC. That is another fifteen to thirty minutes, on top of everything covered in this post.
As a final option, you can use direct port forwarding, but it is the least attractive option. It works, but forces you to configure the router and exposes the Remote Desktop service more.
Important: whichever method you choose, try to ensure that the PC you want to access is connected to the router by cable, or otherwise has good Wi-Fi coverage.
Performance: does it work well in Full HD?
For working at 1920 × 1080, RDP should perform well with a normal network connection.
Upload bandwidth usage depends greatly on what appears on screen:
- A document or administration panel uses little bandwidth.
- Scrolling quickly through image-heavy websites uses more.
- Playing video increases traffic considerably.
- Gaming or editing video is not the ideal use for RDP.
The most important factor is the upload speed of the connection where the PC is located, because that connection has to send the image to your Chromebook, phone or laptop.
Other factors also matter:
- Latency between the two connections.
- Wi-Fi coverage on the remote device.
- Whether the PC is connected by cable.
- Windows visual effects.
- Continuous movement on the screen.
Meshnet or Tailscale add encryption and a private network layer, but they should not prevent you from working in Full HD. On a normal connection, latency and the quality of the networks at both ends are usually more important than resolution alone.
That said, in my case, I tried working at 4K and it was not viable even with RDP (you are sending four times as much information), so I settled for a lower resolution.
Tips for improving the experience:
- Connect the PC to the router with an Ethernet cable.
- Use good Wi-Fi coverage on the access device.
- Set the session to 1920 × 1080, no higher.
- Disable animations and transparency effects in Windows if you notice lag.
- Avoid playing video inside RDP.
- Close applications that consume a lot of upload bandwidth.
For office work, programming, AI work and even design, Full HD should be perfectly usable, especially with RDP.
Shutting down correctly
When you finish, do not simply close the remote-access application; instead, you must shut down Windows from the Start menu, just as you normally would.
Closing RDP, Chrome Remote Desktop, AnyDesk or TeamViewer usually only disconnects the session. The computer may remain switched on.
After Windows has finished shutting down, you can leave the plug on. Next time, perform a quick cycle:
- Turn off the plug.
- Wait five seconds.
- Turn on the plug.
- Connect to the PC once it is on.
Alternatively, you can switch it on through WoL with your Raspberry Pi and TeamViewer if you do not have a smart plug.
Common problems
Let us look at some things that can happen.
The PC does not start when the plug is switched on
Check the BIOS and make sure it is configured as follows:
After Power Loss: Power On
Repeat the test by physically disconnecting and reconnecting the power cable.
You obviously need to do this from home before going on holiday.
The PC starts, but does not appear as available
Check that your chosen tool starts with Windows:
- NordVPN, if you use Meshnet.
- Tailscale, if you use that network.
- The Chrome Remote Desktop service.
- AnyDesk installed with unattended access.
- TeamViewer Host or the client configured for remote access.
Then restart the PC and test without manually opening any application.
Meshnet works, but RDP will not connect
First check Windows itself in PowerShell:
Test-NetConnection 127.0.0.1 -Port 3389It should return:
TcpTestSucceeded : TrueIf it returns False, RDP is not listening. Check that Remote Desktop is enabled and restart the computer.
RDP rejects the user name or password
Run this in the terminal:
whoamiUse the result as the account:
NOMBRE-PCusuarioDo not confuse:
- The local user name.
- The account’s display name.
- The Outlook email address.
- The Windows PIN.
- The actual password.
The fact that Windows displays a Microsoft email address does not mean you must use it as the RDP user name. On some computers, the local account works directly, such as NOMBRE-PCpcadmin.
It only works after opening NordVPN
Enable: Launch NordVPN when Windows starts.
Also check that Meshnet remains enabled after restarting.
Test without opening the NordVPN window: if it connects, the application and Meshnet are running in the background.
It works on your home Wi-Fi, but not from outside
Check that you are not using the local IP: 192.168.x.x.
For Meshnet, you must use the PC’s IP: 100.x.x.x.
You must also turn off Wi-Fi on your phone during the test and use mobile data. That way you will know that the connection is genuinely coming from outside your home.
Conclusions
As you can see, going on holiday with a tablet or Chromebook while still being able to work normally is perfectly possible, but it will take a little time and €10 for a smart plug.
In my case, it is completely worthwhile because I maintain my philosophy of keeping devices compartmentalised and take a lightweight leisure device with me while continuing to develop my game on my home PC.
I kill two birds with one stone and continue to protect my privacy.
By the way, I know this is a long and dense post, so if you have questions, ask me. We can look at your situation and assess the best route.
Frequently asked questions
How can I switch on my PC from outside my home?
The simplest way is to connect it to a smart plug and configure the BIOS option Restore on AC Power Loss, After Power Loss or something similar. When you cut and restore power through the plug’s app, the computer will start automatically.
What is the simplest setup for accessing a PC remotely?
The easiest combination is a smart plug and Chrome Remote Desktop. You do not need Windows Pro, open router ports, pay for a VPN or configure a private network.
Do I need Windows Pro to connect to the computer?
You only need Windows Pro or Education if you want to use Microsoft Remote Desktop as the server. Chrome Remote Desktop, AnyDesk and TeamViewer also work with Windows Home.
Which option provides better quality: RDP or Chrome Remote Desktop?
Windows Remote Desktop usually provides better image quality, smoother performance and lower latency. Chrome Remote Desktop is easier to configure and works on more Windows editions, but its performance may be slightly worse.
Can I access the PC from a Chromebook, tablet or phone?
Yes. You can use Chrome Remote Desktop, AnyDesk, TeamViewer or the Microsoft application compatible with your device. For comfortable work, a tablet or Chromebook with a keyboard and mouse is ideal.
Is it safe to open the Remote Desktop port on the router?
It can work, but it is not the most advisable option because it leaves the RDP service more exposed to the Internet. It is better to create a private network with NordVPN Meshnet or Tailscale and connect using the IP assigned by one of those services.
Why does my Windows PIN not work when connecting through RDP?
Because Remote Desktop does not use the Windows Hello PIN. You must enter the real name of the PC account and its password. You can run whoami in the terminal to check the correct user name.
Can I shut down the computer by cutting power with the smart plug?
You should not. The plug is mainly used to trigger PC startup. When you finish working, shut down Windows through its normal menu and wait for the computer to shut down correctly.
What happens if the computer goes to sleep?
Remote-access applications may stop responding even though the plug remains on. To prevent this, configure Windows so the computer does not go to sleep while connected to power.
Can I work remotely in Full HD?
Yes. For office work, programming, web management, AI work or design, a 1920 × 1080 session should perform well. The most important factors are good PC upload speed, low latency and, preferably, a wired connection to the router.

Leave a Reply