
I think by now we’ve all accepted that privacy on the internet is basically a fairy tale.
If you want to enjoy “free” services like Gmail, Google Analytics, Instagram, or read any publication without a paywall, you have to pay with your data.
OK, it’s a fair system that worked very well until not so long ago.
However, sometimes you’d rather browse anonymously online, without anyone, not even your internet provider, knowing what you’re doing.
Because your provider has ways to know exactly what you’re doing at all times, with technologies such as DPI (Deep Packet Inspection). And maybe one day it decides to sell that data.
Or it gets hacked and someone else can see it.
You might also want to buy from a website that is down in Spain at that moment, by the grace and glory of LaLiga and its blocking of Cloudflare IPs, where the innocent end up paying for the guilty.
Whatever the case, it is more than convenient to have a service that removes these problems. And this service has a name.
Índice de Contenidos del Artículo
What a VPN is
A VPN (Virtual Private Network) is nothing more than a service that lets you route your internet connection through servers in different parts of the planet.
This way, your ISP will not really know where you are going, and your traffic will be private to everyone except the VPN provider.
That is why it is important to use serious VPN providers that do not resell that data.
And in this second article in the series dedicated to Chromebooks I’m going to explain how to set it up on your device.
Reliable VPN services
As with everything online, you can pay for the service or use a free one.
I use one of each interchangeably:
- Free: Proton VPN (also with a paid plan).
- Paid: NordVPN (here’s my affiliate link in case you’re interested in subscribing)).
Why do I pay for something that is available for free? Well, because this one gives me many more options that I actually use.
And, for the €3 I pay a month, it more than pays off.
In any case, for simple things, Proton’s is more than enough.
Ways to set up the VPN on Chromebook
I’m going to use NordVPN throughout this tutorial guide, but you should know that with any other paid VPN you can use these same three options.
Let’s go from the simplest to the most complex.
Method 1: use the Chrome extension
NordVPN provides an extension for several browsers, including, of course, Chrome, which, if you read my previous article about how to optimize a Chromebook and took my advice, will be the browser you are using.
You can download its extension here.
Once you install it and log in, all traffic that passes through the browser will be private.
As you can see, very simple.
The problem is that traffic that does not go through the browser will not be. And, in my case, I need my torrent download program to be private. So I have this option implemented, although I think I’ll delete it sooner rather than later, because although useful, it is redundant.
Method 2: Android app
This method is not as immediate as the previous one, but almost.
It consists of going to Google Play, downloading and installing the NordVPN app. To do that you need to have the option to install Android apps on the Chromebook enabled, of course.
Once you are logged in and connected, all device traffic — not just browser traffic — will be private.
And if it is that simple, why isn’t it the alternative I use?
Well, because as I told you in my previous article, having Android enabled on the Chromebook means background processes are running and RAM usage shoots up to 2GB. Whether you are using any of the installed Android apps or not.
What’s more, even if you have none installed, just having the option enabled already consumes RAM. So I have it disabled, because my laptop only has 4GB and I need it to run smoothly.
Well, I’m lying: I have it disabled in my work profile on the Chromebook, because I want it to run as smoothly as possible. In my leisure profile (with another Gmail account) I do have it enabled for convenience.
Method 3: native configuration
It is the most technically complex option, but the best one for Chromebooks with little RAM.
Besides, since I have already researched the different methods and fought with them, you do not have to. Just replicate the system I explain a little further down. It is quite simple and in under 5 minutes you will have it up and running.
Method 4: configuration in Linux
There could be one more possibility, but I could not get it to work.
This theoretical option consists of configuring NordVPN in the Linux environment from the terminal and, although I managed to install the app and log in correctly, I could not connect to any server, despite trying several different ways. It always gave me an error.
So I discarded it and stuck with the previous one.
Set up VPN on Chromebook step by step
Before starting, you need to know that there are four different VPN protocols on Chromebooks:
- IPsec (IKEv2): the one that worked for me.
- L2TP/IPsec: I did not try it.
- OpenVPN: the one selected by default and the one I tried a thousand ways, but there was no chance.
- WireGuard: it is supposedly the best protocol, but NordVPN only implements it through its app.
Right, after a thousand and one tests, I managed to make it work with the first one, which, as I say, is not the default in ChromeOS.
To do this, you have to follow several steps. Do not worry, because they are simple and will take you 5 minutes at most.
#1. Download the NordVPN certificate.
In this tutorial where they explain how to install the VPN manually on Android, you will find the download link.
If you do not want to enter the tutorial, here is the direct link to the certificate.
A file called root.der”.
Save it and keep it handy, because we are going to need it right away.
#2. Install the certificate
Open a Chrome tab and type:
chrome://settings/certificates
Go to the “Authorities” tab and click Import.
Select the file you downloaded in the previous step.
When importing, make sure to check the box "Trust this authority to identify websites".
Once this is done, you will see it:
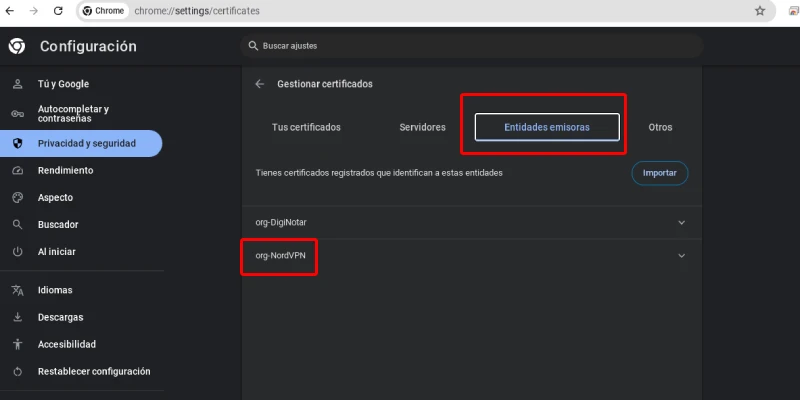
And we can use it whenever we need it.
#3. Get the NordVPN server name and service credentials
This is done by logging into your NordVPN account in the browser.
Go to the “Manual setup” section.
And in the first tab (“Server recommendation”), choose the country and server you want. This is the one they recommend by default, but you have others below:
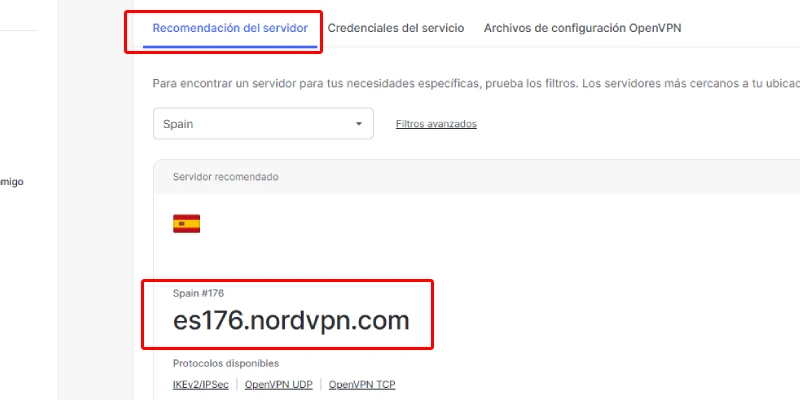
Important: if you want to connect from several countries you will have to configure several VPN connections in the operating system. You cannot switch from one to another as you would in the app.
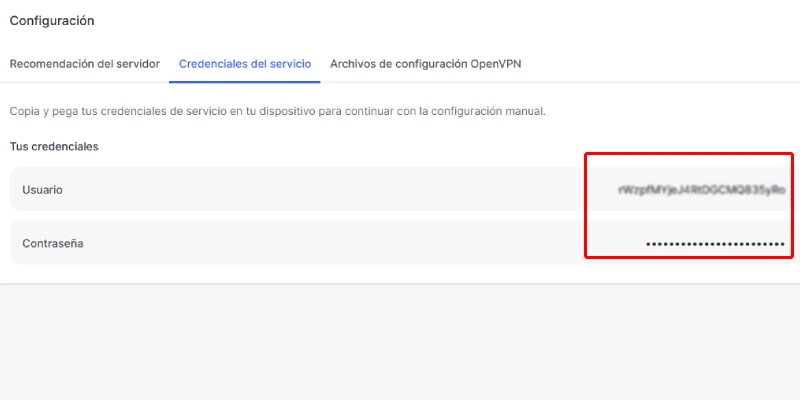
Write down the name because we will use it shortly, but first go to the “Service credentials” tab and also copy the Username and Password fields:
#4. Add a VPN in ChromeOS
Now click at the bottom, on the toolbar on the right, in the network section, and the option will open. Click VPN:
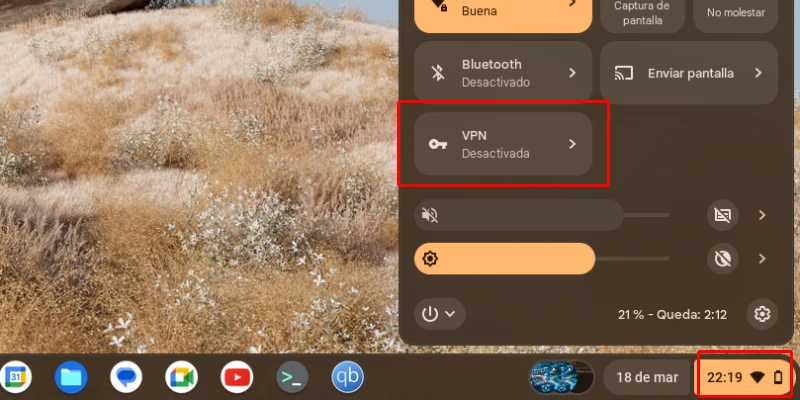
When you create a new one, a window will open where you will have to enter the data we have been collecting:
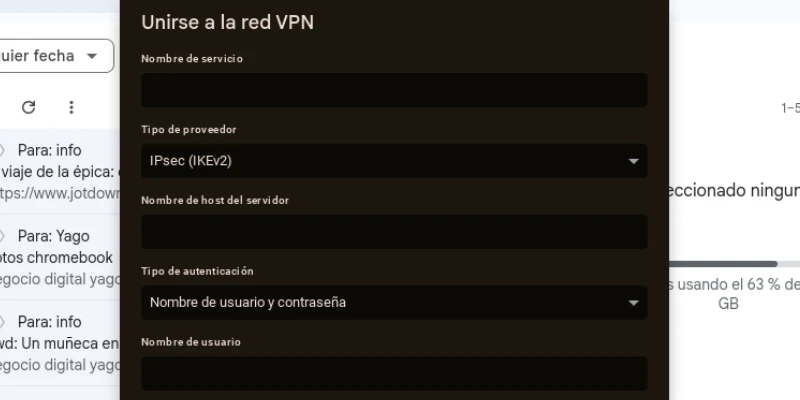
- Service name: this is the name you want that VPN to have when you select it. Usually, you’ll add the country name: “Spain1” or “USA3”.
- Provider type: change OpenVPN to IPsec (IKEv2).
- Server host name: paste here the server name you copied in step 3.
- Username: paste the service credential username we copied in step 3.
- Password: the same with the password.
- Local identity: leave blank.
- Remote identity: leave blank.
- Server CA certificate: select the certificate we imported in step 2.
- Save username and password: optional, but recommended.
With this ready, click the connect button and in milliseconds you will be connected to the VPN.
You will be able to see it here:
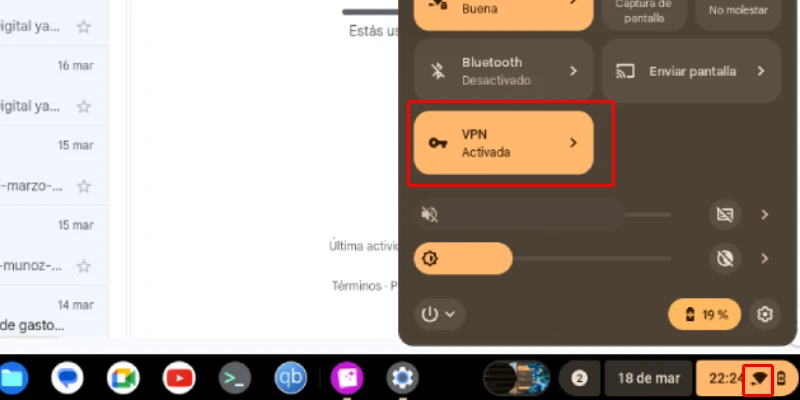
When opening the network options or on the little Wi-Fi icon, which appears with a key.
#5. Check that it worked
To do this, you only have to go to some website like this one and check that the IP and country change depending on whether you are connected to the VPN or not:
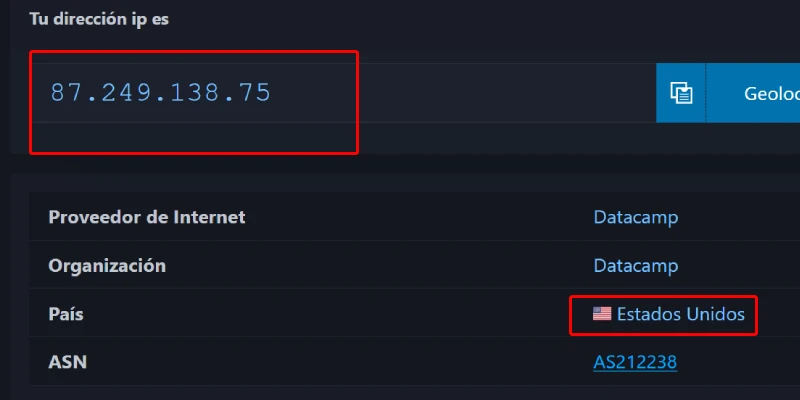
You will see that everything has gone well and you will recover your browsing privacy whenever you need it.
It was not hard to follow the steps, was it?
Conclusions
When you know how to set it up, it is quite easy to do, at least with NordVPN, despite being steps you do not perform every day.
I do not know what the rest of the paid VPNs are like in this regard, but I imagine it will be a fairly similar process, since the data ChromeOS asks for is quite standard.
With this active, and despite the theoretical loss of download speed from using a service like this, the truth is that you gain a lot.
For example, you will be able to connect to other countries and watch the Netflix or HBO catalog there. That is what I did to watch the fourth Matrix film when HBO took longer to release it in Spain.
Likewise, you can do it to use AI tools that launch earlier in the United States, such as Sora.
It will also be useful for downloading torrents, since NordVPN has specific servers for them where download speed is supposedly increased.
Finally, with this you will prevent your ISP from throttling your speed when you are downloading something, since it will not know where you are connecting to.
Or you will tinker with your crypto more privately.
Or you will be able to bypass LaLiga’s blocks.
In short, you will be playing in another league (hur hur) when it comes to connecting to the internet.
And all of this on your ultra-optimized Chromebook, with longer battery life and much faster than stock…
Now it’s worth spending this little while and setting it up, isn’t it?
Frequently asked questions
What is a VPN?
A VPN (Virtual Private Network) is a technology that encrypts your internet connection and routes it through an external server. This hides your real IP address, protects your data, and lets you browse with greater privacy.
What is a VPN for on a Chromebook?
A VPN protects your internet connection by encrypting data traffic. This improves your privacy, prevents third parties from tracking your activity, and lets you browse more securely, especially on public Wi-Fi networks.
Can you use a VPN on any Chromebook?
Yes. Chromebooks allow you to use VPNs through compatible provider apps, browser extensions, or manual settings from the operating system.
What are the benefits of using a VPN on a Chromebook?
Mainly three: greater privacy when browsing, access to content that may be blocked in your country, and a more secure connection when using public or shared networks.
Do VPNs slow down the connection on a Chromebook?
There may be a slight reduction in speed because the data passes through an intermediate server. However, with quality services the difference is usually minimal and barely noticeable in normal use.
Is it safe to use a free VPN on a Chromebook?
It depends on the provider. Some free VPNs may limit speed, data, or even collect user information. That is why it is usually more advisable to use recognized services that prioritize privacy.
Do I need technical knowledge to use a VPN on a Chromebook?
No. Most services offer apps or extensions that are very easy to install. In a few minutes you can activate it and start browsing with greater privacy and security.

Leave a Reply