
Acumbamail has several good things going for it.
One thing stands out above all: its deliverability.
However, the tool's setup is not the most intuitive. Or at least that is how it seems to me.
That is why, in the Acumbamail course I am publishing, I explain the process step by step so you can start getting to grips with the tool.
In previous articles, we looked at:
- What Acumbamail is and why you should use it.
- How to sign up (for free or with a discount).
- How to create lists and import subscribers.
In this article, I’ll explain clearly and simply how to create a basic subscriber signup form in Acumbamail.
This form will allow visitors to subscribe to your list by entering their email and any other details you consider appropriate, while also requesting explicit consent and complying with the GDPR.
Here is the whole process on video:
Next, the text version with screenshots, so you can follow it in whichever way suits you best.
Step 1: Create a new list
The truth is that creating a new list is not essential. You can use one you already have, for example the one we created in the previous lesson, where we imported users from another tool.
But if you do not already have a list, the first thing to do is create one.
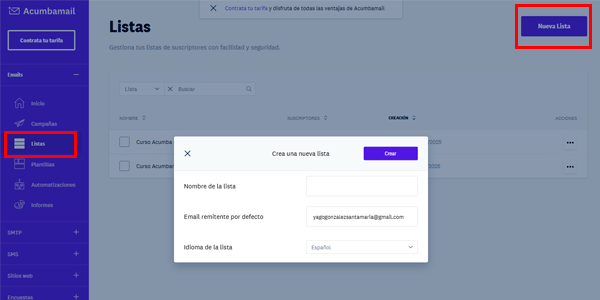
To do so, log in to your Acumbamail account and go to the "Lists".
Click "Create list", give it a name and save it.
Step 2: Create custom fields
Before creating the form, you need to decide what data you will collect in addition to the email address.
To add them to the form later, go to the "Fields" section of the list you have just created and click "Add field":
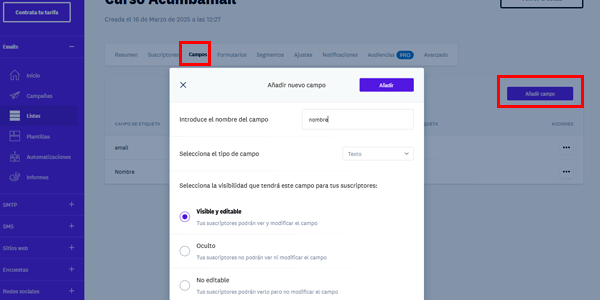
Add the "name" field if you also want users to enter their name. In this case, the field type would be "text". I also recommend writing the field name in lowercase to make it easier to manage later.
This field must be "visible and editable" so the user can complete it.
You can add any type of field to the form, not just a name field. For example, a number field for a phone number, or several checkboxes if you want to learn about the subscriber’s interests.
Step 3: Required privacy field
Another field you must add if your website operates in Spain is acceptance of the privacy policy, as required by the GDPR.
This field has a trick to it:
- Click again on "Add field".
- Name this field "privacy", for example.
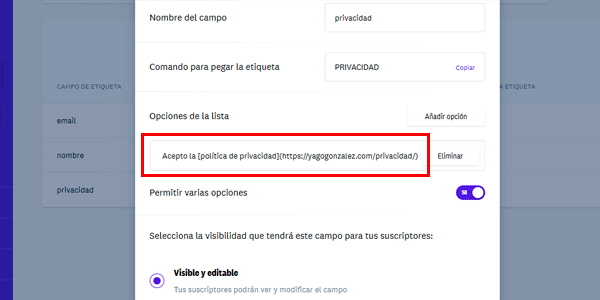
- Select "multiple choice" as the type, then choose "list" and "allow multiple options".
- In the list option, enter the text used to accept the privacy policy.
Important: To add a link in Acumbamail, use the following structure:
I accept the [Privacy Policy](https://tuweb.com/politica-privacidad)
Place the text you want to link inside square brackets "[ ]", followed immediately by the URL in parentheses "( )".
Step 4: Check double opt-in
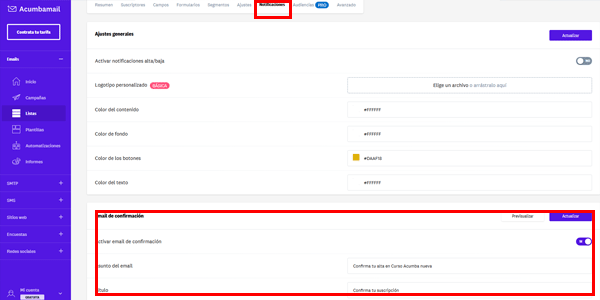
Although Acumbamail includes it by default, it is worth going to the “Notifications” section and reviewing the confirmation email, both its wording and design:
Here you will have two options for creating the registration confirmation page:
- Use a page created in your CMS (for example, WordPress) and enter its URL here.
- Use the page Acumbamail generates automatically, which you can customise in terms of both design and wording.
Step 5: Create the form
Now that everything is configured, this is when we actually create the subscription form.
To do so, select "Create form" from the top menu.
The free plan only lets us create “classic” forms, while paid plans also allow pop-ups or bars.
Choose the type and, once inside:
- Select the template: my advice is to choose a simple one, as it will be easier to adapt to your website's look and feel.
- Under settings: once again, you can choose between showing an OK message when a user enters their email or using a WordPress page and adding its URL here as an intermediate notice page. In both cases, the message should explain that a confirmation email has been sent to the registered address and must be verified; otherwise, the email will not be added to the list. This is what we configured in the previous step and is known as “double opt-in”.
- Design: adjust the text and colours to match the website's style. Also add the fields created earlier: Email, name (optional) and privacy (required).
Here is the “Privacy” field configuration, which must be set up this way for the text and link to appear as intended:
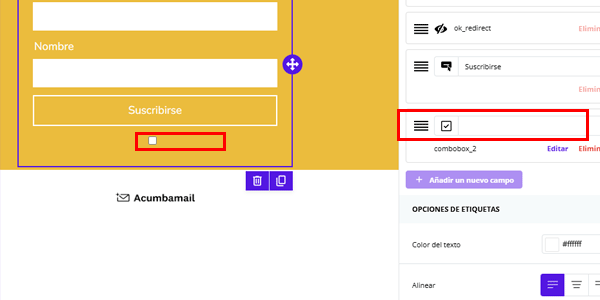
Do not forget to click “Edit” and mark it as required:
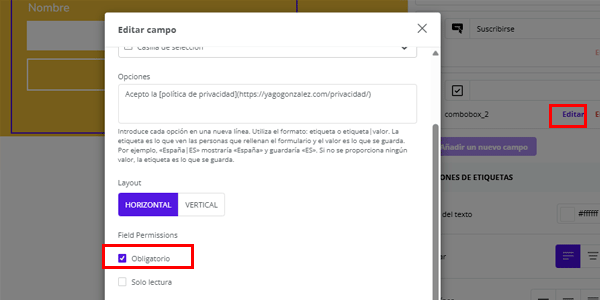
Save it; we are almost finished.
Step 6: Test your form
Finally, all you need to do is open this URL generated by Acumbamail in your browser:
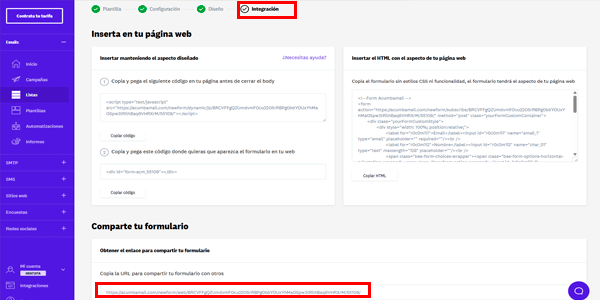
And check that everything works as expected, both visually and operationally:
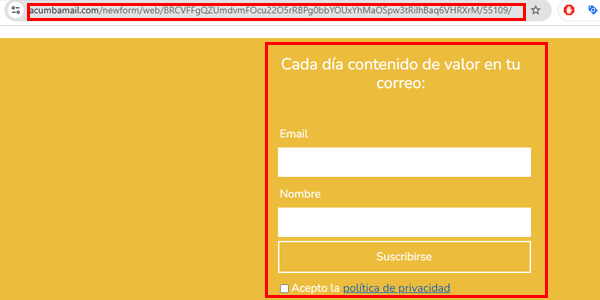
Bear in mind that it is already live. In other words, if you sign up, your email will be added to the list, okay?
But the proper thing to do is complete the process to make sure everything works as it should.
Step 7: Embed the form on your website
Finally, you will have seen on the form's final settings page that Acumbamail will generate a code that you can easily embed on your website.
You only need to copy this code and paste it wherever you want the form to appear on your website, but I would rather explain that in more detail in the next video. I think that is enough for today.
Conclusion
If you are used to other email marketing tools, you will have noticed that this step seems a little more cumbersome here.
No problem: follow these steps and you will have it set up in five minutes.
And you only have to do this once.
I will wrap up for today by reminding you that all the lessons from the Acumbamail course are available directly on video.
And here you can read them in text form, in case you prefer them that way.
You can sign up for Acumbamail's free or paid plan here: https://acumbamail.com/?refered=236540.
You can also subscribe to my newsletter and receive these articles in your inbox every Thursday.
Or, if you prefer, you can watch the videos here: my YouTube channel.
Either way, see you soon.

Leave a Reply