
Migrating a website can be very simple.
It can also be very complex, of course. It depends on what each case requires.
However, in this article I’m going to explain how to migrate a website in a fairly standard scenario:
Migrating a website as part of a brand rebrand and name change, while reusing much of what is already built and working.
This, as I said, is quite common and can involve different scenarios:
- The project I led at TiendAnimal , which involved four months of work.
- The one at Lowi, which was smaller and was ready in a couple of months, despite affecting both the website and the two apps.
- Or the one I’m going to use as an example here: the García Méndez law firm, which I completed entirely in one month, spending a few hours on it each week. That would have amounted to about 3 full days of work if I had done it continuously.
How did these projects differ?
In the scope of the migration and the complexity of the website.
At TiendAnimal, all the CSS and some of the HTML structure were changed where necessary, turning a desktop-only website into a responsive design, while keeping the content and domain.
In Lowi’s case, it was also a stylistic change, except the HTML structure was not touched and the website was much simpler.
And in García Méndez’s case, although we migrated the domain and added content, as well as making aesthetic adjustments, having a CMS such as WordPress underneath with almost no custom development made the work much easier.
Before I explain everything that needs to be done, you need to be clear about certain concepts so you know what we’re talking about at each point.
But if you already know them and want to go straight to the step-by-step tutorial, you just need to click here..
Índice de Contenidos del Artículo
- Concepts and preliminary considerations before the migration
- Our case
- Steps to migrate the website
- #1. Add the domain to the hosting account
- #2. Clone the website
- #3. Add HTTPS
- #4. Prevent Google from indexing the site
- #5. Change the corporate colors
- #6. Change the logo and favicon
- #7. Change texts and images
- #8. Create new sections
- #9. Restructure the website
- #10. Change the menus
- #11. Create new corporate email accounts
- #12. Link them to Gmail accounts
- #13. Change the address in the contact forms and on the website
- #14. Change the contact details
- #15. Change the name in WordPress core and in plugins
- #16. 301 redirect
- Steps after migrating the website
- How to undo the migration
- Conclusions
Concepts and preliminary considerations before the migration
A website migration can cover different issues, which I’ll discuss below.
In trying to cover all the possibilities, I should warn you that some parts are a little technical.
That said, I’ve tried to make them as accessible as possible so anyone with some technical understanding of how hosting works can follow them.
Here’s a diagram so you can clearly see the different scenarios I’m going to explain:
- Migrate the domain or not
- Migrate the website content: CMS platforms
- #1. Do not migrate the CMS or the installation
- #2. Keep the CMS but migrate the installation
- Migrate WordPress to another WordPress installation
- #3. Migrate to another CMS
- Migrate WordPress to another CMS
- Migrate hosting or not: migrate WordPress within the same hosting account
- Migrate WordPress to a different hosting provider
Migrate the domain
The domain is your name on the internet. It’s what you purchase from the provider. For this website, the domain is yagogonzalez.com.
Yes, including the .com. Because yagogonzalez.net is a different domain.
So, when we talk about migrating a domain, what we’re doing is changing our name on the internet. In the example we’ll use, we changed garciamendezabogados.com to abogadosdegalvezygarciamendez.com.
Despite my reluctance to use such an incredibly long domain, that was the client’s choice. There’s little more to add here.
The thing is, changing the domain isn’t just a matter of changing the name and that’s it.
First, if you’re going to reuse parts of the website, you’ll need to change all the internal links. If you’re not going to reuse anything, then this isn’t necessary.
Second, if you’re working on SEO, you need to do it properly so you don’t lose the rankings of pages that matter to you, along with the resulting loss of conversions.
In the case at hand:
- We’re going to reuse (almost) the entire website.
- We’re working on SEO and rank in the top 3 for several of the most relevant keywords.
This means there’s more work to do when migrating.
Migrate the website content
When we talk about content, we mainly mean the text and images included in the page body. Not so much those in the header or footer.
So, you need to know that there are two ways to migrate this content:
- Take the text and images as they are, as if it were a Word document.
- Take the HTML code from this section of the website and reuse it.
And to these two methods, we add the variable of whether the content will be copied as is or undergo some modification.
In our example:
- We’ll reuse the HTML code stored in the database, since we’re going to use the same CMS.
- However, it needed changes because the original website was written in the first-person singular: Fernando García Méndez spoke as “I”. The new website represents two lawyers, so the copy had to switch from “I” to “we”, with all the editing that involved in both Spanish and English.
I can tell you now that this was one of the areas that took the most hours during the migration. And there’s nothing technical or marketing-related about it: it’s pure text review.
And if we’re talking about content, we need to talk about CMS platforms—and whether we need to migrate to a different one.
CMS platforms
CMS stands for Content Management System : software used to manage a website’s content.
Nowadays, it’s extremely difficult to find websites built entirely in raw HTML because managing them is much more cumbersome, especially when the content is dynamic and changes over time.
Among CMSs, you should know that the most popular in the world is WordPress, which works for almost any type of website, although it’s true that it can fall short for very large projects.
So, when migrating a website, we may change CMS or keep the same one.
And we may keep the same CMS (for example, WordPress) on the same installation and make the changes to it, or install a new WordPress installation elsewhere, clone the old site’s code and database, and work on the new installation.
In other words, two variables are involved—the CMS and its installation—which produce three possible scenarios:
- Change neither the CMS nor the installation: in other words, make changes to the current website.
- Keep the CMS but use a new installation: we’ll keep WordPress, PrestaShop, or whatever CMS it is, but create a new installation and work on it.
- Change both the CMS and the installation: for example, move from WordPress to PrestaShop. Even if this can be done within the same hosting account, they’ll be different installations with completely different databases.
- Change CMS but keep the installation: this isn’t possible. That’s why I said earlier there were three scenarios, not four.
Now let’s look at each of these options in more detail.
#1. Do not migrate the CMS or the installation
Let’s start with the simplest option. Because you should know that migrating to another CMS is ALWAYS more complex than not doing so. But that doesn’t mean staying with the same one is always best. It depends on each case.
In the lawyer’s case, we considered keeping the same WordPress installation and simply making the changes to it.
The main advantage of doing it this way is that it saves time: you don’t need to do anything at server level, just make the rebranding changes in WordPress and you’re done.
The disadvantage is that, because you’re working on the live website, users see the changes as you make them, which creates a strange experience.
At both TiendAnimal and Lowi, we chose this route for the rebranding. To get around this drawback, we worked with a local version and a staging version (two different installations), which could be modified without affecting the production website.
For the García Méndez website, I didn’t think setting up this stack was necessary.
#2. Keep the CMS but migrate the installation
In this second option, we stay with WordPress, PrestaShop, or whatever CMS it is, but instead of working on the current installation, we use a new one.
Migrate WordPress to another WordPress installation
In other words, replace the current WordPress installation with a different one, either on the same server or another one.
This is what we actually did for the lawyers: two different published versions, where the old one redirected to the new one once it was finished..
One advantage is that the old site remains active and unchanged while work is carried out on the new one, so clients don’t notice anything unusual.
In addition, the main advantage of not using the same installation is having it as a backup so it can be restored later if things don’t work as expected.
If you’re a techie, you’ll tell me that a new branch in a Git repository solves that. But I don’t think setting it up is worthwhile for a website like this.
#3. Migrate to another CMS
Let’s move on to the third and final option: changing CMS.
Migrate WordPress to another CMS
For online stores, it’s common to move from WordPress (with its WooCommerce plugin) to PrestaShop or Shopify when things scale up.
In any of these cases, scripts can help, but on large websites these migrations are far from straightforward and require extensive checking once completed.
For this same reason, informational or corporate websites don’t change CMS as often, because the advantages or differences between one CMS and another are usually not significant enough for these types of sites, and the cost of migration means it’s generally not worthwhile.
Migrate hosting or not
This is almost always optional.
Unless you move from a server-installable CMS (WordPress) to a SaaS-type platform (Shopify), where you don’t manage the hosting yourself because they do it for you, you can choose whether or not to migrate servers.
It goes without saying that changing hosting requires more work than staying with the same provider, even if we use a new CMS installation while remaining on the same hosting.
Migrate WordPress within the same hosting account
In other words, we create a new installation within the same hosting account and migrate the data and content.
On any normal web hosting service, this is relatively simple because the hosting tools themselves (in cPanel or whichever control panel it uses) include an option called “clone WordPress”—or something similar—where all we need to do is specify the directory or subdomain to clone it to, and it does practically all the work for us.
And we can do it using the original domain or any other domain linked to the hosting account.
Honestly, it’s fantastic for migrations, backups, or forks of a web project.
That said, before starting, you’ll need to check whether your hosting plan allows you to create a new database or link more domains than you currently have linked.
This is what I did with the law firm’s website. Further down, I’ll explain the very simple process.
Migrate WordPress to a different hosting provider
To change hosting, the easiest thing is to use a WordPress plugin.
There are many that do it (All In One WP Migration, XCloner, Duplicator…), although with several of them you need the paid version to get everything ready easily.
In a future article I’ll explain how to do it for free, in case you need to and want to save money in exchange for spending a little more time.
Our case
Well, after explaining all the possible combinations when migrating a website, the combination I used here—and will use as the example for the tutorial—is as follows:
- Domain migration:
- Yes, from garciamendezabogados.com to abogadosdegalvezygarciamendez.com.
- Website content migration: Changes to the content and website structure, reusing much of what was already there. A redesign to match the new corporate identity.
- Cambio de diseño web, adecuándose a la nueva identidad corporativa.
- CMS change: no, we’re staying with WordPress.
- Within the same hosting account.
A common scenario, neither the simplest nor the most complex. It will serve as a guide you can replicate when you need to.
Steps to migrate the website
With the preliminary concepts clarified and the context outlined, let’s move on to the step-by-step tutorial.
First, here’s a summary in video form:
And then the expanded step-by-step guide in text.
IMPORTANT: In this case, the video and text complement each other, so if this is your first migration and you want all the information, I recommend watching the video first and then following the written step-by-step guide.
#1. Add the domain to the hosting account
This is only necessary if we’re migrating the domain. If we’re keeping the same one, there’s no need.
So, if we’re changing the website’s domain, linking the domain to the hosting account is the first step.
There are two options:
- If you purchased the domain you want to migrate to through the same hosting account, this will already be done.
- If you purchased the domain from a different domain provider, you’ll need to add the new domain to the hosting account and also change the DNS settings at the domain provider so they point to our hosting.
In this case, the new domain was purchased through the same account that held the hosting, so we didn’t need to link it.
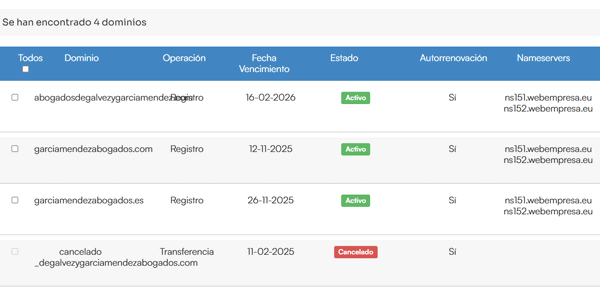
By the way, all the hosting screenshots are from the client area and control panel at Webempresa, but they’re usually similar across all reputable WordPress hosting providers.
#2. Clone the website
No plugins here.
Since we’re using the same hosting, as I explained earlier, we’re going to use a tool provided by the hosting company (not a WordPress plugin) that lets us clone the website by choosing the domain and directory from which it will be accessed:
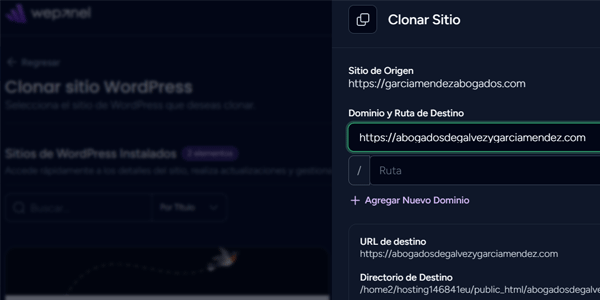
Honestly, this option is fantastic for those of us who aren’t developers.
That said, remember that if for any reason you want to set up the website on another server, this won’t work and we’ll need to use plugins.
#3. Add HTTPS
In the previous step, we may not have been able to choose the protocol used to install the new website.
No problem: within the same hosting account, we can have the hosting platform change it for us:
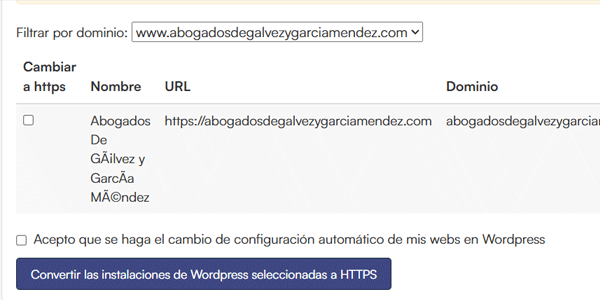
That said, because we didn’t do it from the start, there may be internal links in the WordPress database that point to HTTP URLs.
To check this, we can use Screaming Frog:
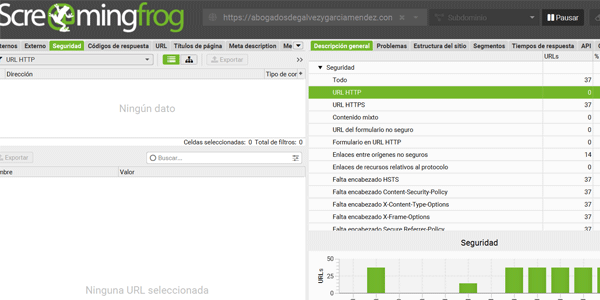
And then manually correct any remaining links in the relevant part of WordPress (there may still be some in widgets or in the footer).
#4. Prevent Google from indexing the site
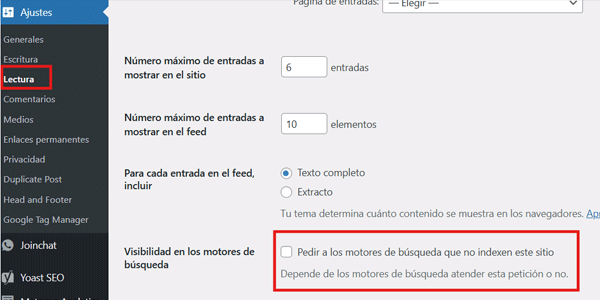
Since we’re going to work on the cloned website, while we’re doing so, we don’t want Google to index this website, because it would be duplicate content.
To do this, in the WordPress options (under Reading settings), we enable this option on the new website:
#5. Change the corporate colors
This will depend on how extensive the necessary changes are, but you’ll definitely need to adjust several areas.
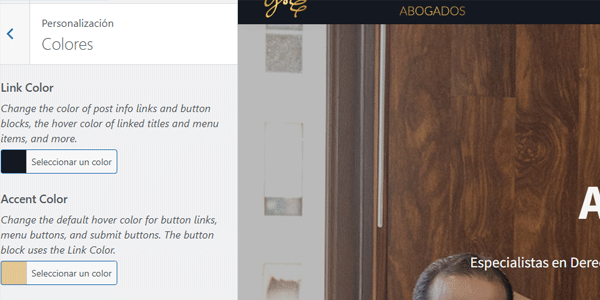
Color changes in the theme
In our theme (Genesis Framework), this is done from Appearance / Customize / Colors:
Color changes in CSS
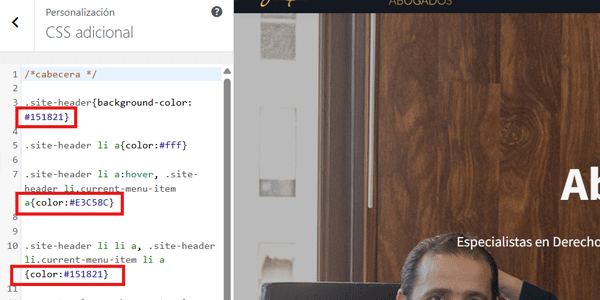
You may have changed them under Appearance / Customize / Additional CSS:
Color changes in plugins
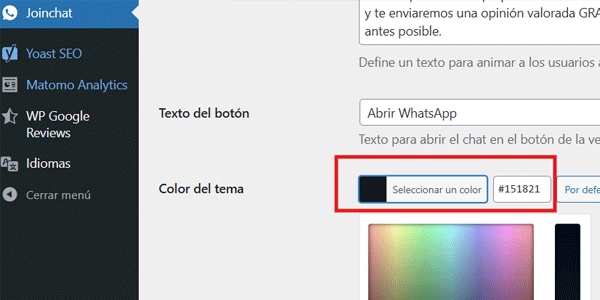
It depends on which ones you have installed. In our case, they were the following.
WhatsApp:
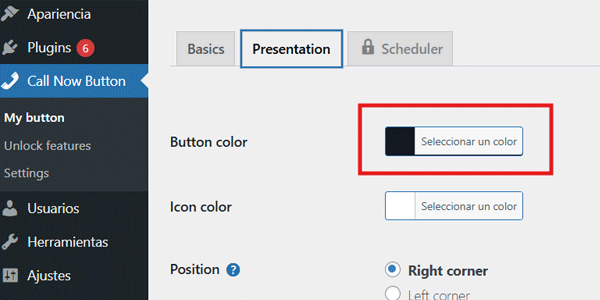
Call button:
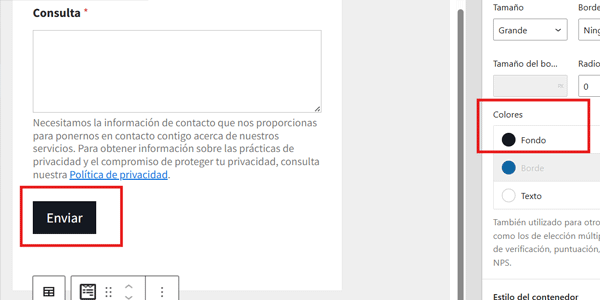
Contact forms:
#6. Change the logo and favicon
For the header , this is done from Appearance / Customize / Site Identity:

And it’s much easier if you can adapt the new logo to the same image dimensions as the previous one. That way, you avoid having to review the entire responsive layout.
If you have a plugin such as Yoast SEO, you’ll probably want to change it here too:
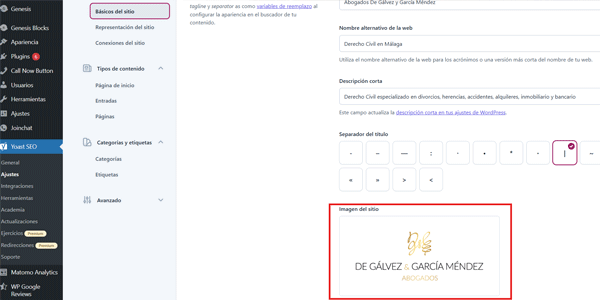
So that this image appears in the Schema and the Open Graph data.
#7. Change texts and images
If changes are needed here, this will be the longest step, without a doubt.
You’ll need to open every URL you want to change (pages and blog posts, where applicable) and update whatever is needed:
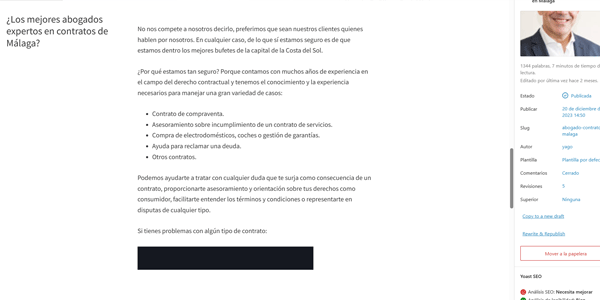
In our example, I had to change the approach—from speaking as “I” to speaking as “we”—which took quite a while.
In addition, I had to do it in English and Spanish. And of course, I couldn’t forget the legal texts.
On-page SEO optimization
If you’re working on SEO, at this point you’ll need to adapt:
- Title
- Description
- Image alt text
For each URL:
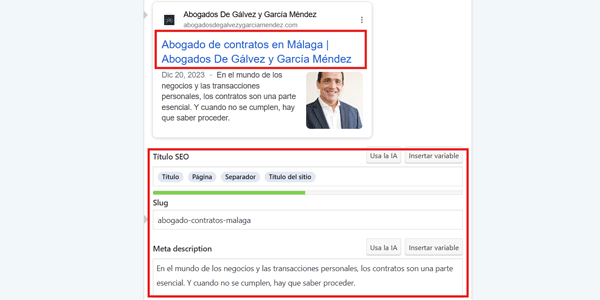
In this case, not so much for SEO itself (it was already optimized), but for branding, to insert the new brand name wherever appropriate:
#8. Create new sections
Moving from one main lawyer to two meant creating sections for the new lawyer, as well as an “About us” section that hadn’t been necessary before:
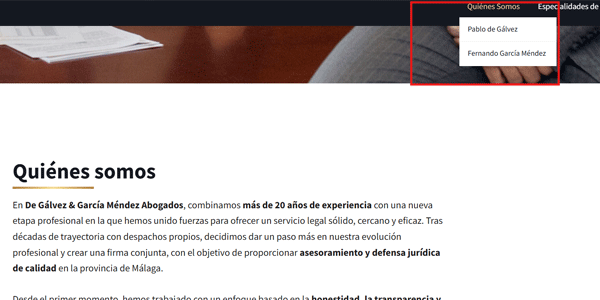
Not always, but it’s not unusual for a rebranding or a major brand change to involve creating new sections, updating the About us section or adding a blog post explaining the reasons for the change.
#9. Restructure the website
Sometimes a migration is used as an opportunity to change the website’s structure.
This can make things easier or harder because, if the change is substantial, it may not be necessary to consider 301 redirects because they don’t make sense from an SEO perspective, whereas small changes may still require them.
In our example, the only change was the one already mentioned: adding the About us section, under which sat Fernando’s existing profile page and Pablo’s new one.
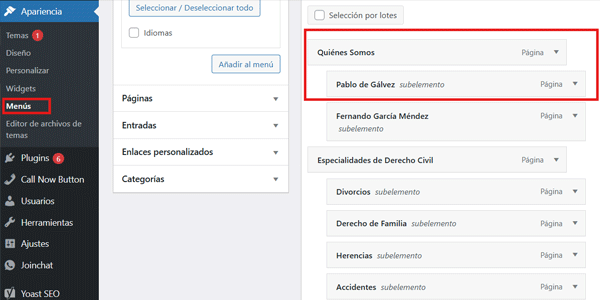
Of course, however small the structural change, the menus will need to be updated.
In this case, from Appearance / Menus I added two items to provide access to the new sections:
#11. Create new corporate email accounts
Let’s briefly change tack and create the new email accounts in the hosting account, one for each lawyer and one general contact address:
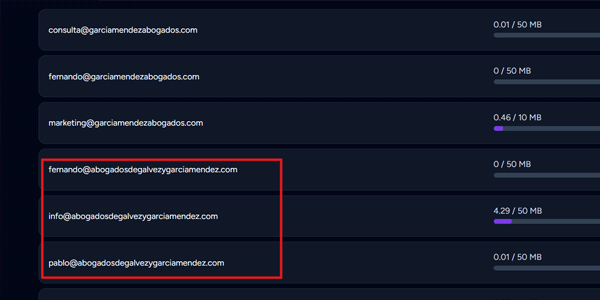
We’ll need them for step 13.
#12. Link them to Gmail accounts
Since hosting webmail services are usually not the most convenient way to manage corporate email, and almost everyone knows how to use Gmail, what we do now is link the accounts created in the previous step to new Gmail accounts.
You’ll find a complete step-by-step tutorial by clicking the previous link.
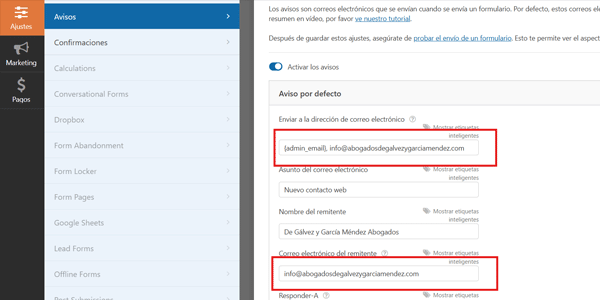
#13. Change the address in the contact forms and on the website
Of course, the forms on the new website need to send messages to the new corporate email addresses, so we’ll change them in every form:
#14. Change the contact details
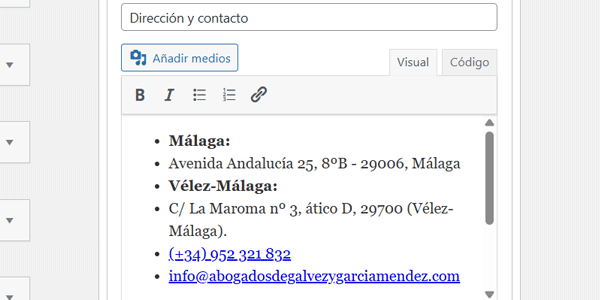
Following on from the previous point, besides changing where the website forms send messages, we’ll also update the contact details.
At least the email addresses. And, in our case, the phone numbers as well.
This wasn’t the case with the social networks because, for now, the old ones are staying, so I didn’t need to change the links. Think about whether you need to update these links in your case.
You’ll need to do this everywhere they appear. The most common places are the contact page, widgets, footer, header…
#15. Change the name in WordPress core and in plugins
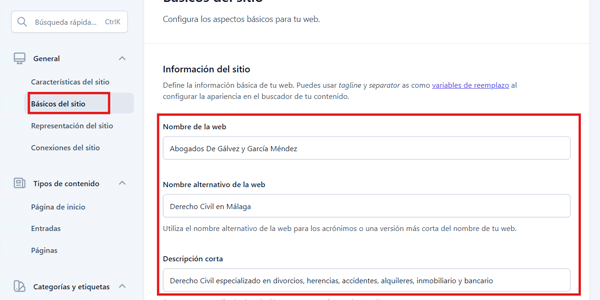
If you use Yoast SEO or a similar semantic-markup plugin, don’t forget to update the new brand name:
Also remember to change it in WordPress core, which is done from Settings / General:
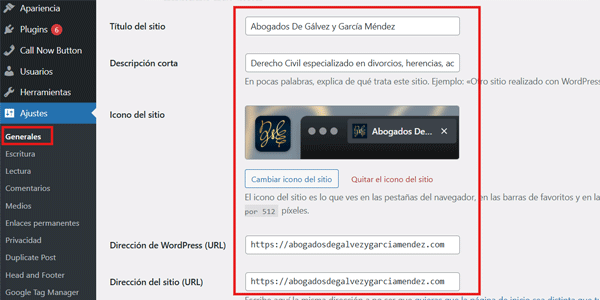
If you don’t, the old brand name will appear in Google snippets or when a URL is shared on social media, WhatsApp, or Telegram.
It’s important.
Once you’ve done that, we’re just about finished with the migration itself.
#16. 301 redirect
The final migration step.
And the only one that is carried out on the old website, not the new one.
The aim here is to preserve the SEO work already done by telling Google which new URLs correspond to the old website’s URLs.
This way, Google understands the migration and tends to preserve the old rankings for the new website.
In addition, while it updates the results in the SERPs, users who click one of the cached old URLs will be redirected to the new website.
All very seamless.
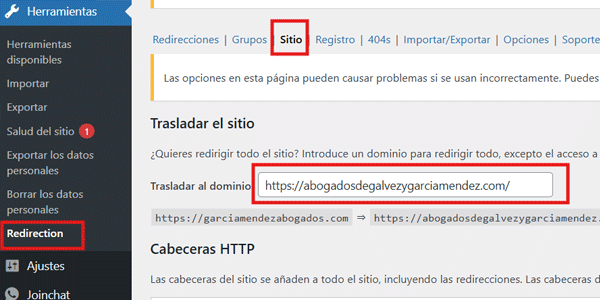
In this case, we use the Redirection plugin to migrate the entire domain.
Because we cloned the whole website exactly as it was, the old URLs will be identical to the new ones apart from the domain change, obviously.
Here’s how it’s done:
Steps after migrating the website
Yes, the migration is complete.
But no, we’re not finished. There are still a few more things to do on the website.
Also, a website is usually more than the website itself. It often has certain linked services. Services that will need to be updated once the new website is fully operational.
#1. Allow search engines to index the new website
In the WordPress admin, go back to where we were before (Settings / Reading) and untick this option:
Optional: discourage indexing of the old website
It might seem logical to do the opposite on the old website: go to the same place and tick the box, since we no longer want it indexed but deindexed. However, I don’t do this for several reasons:
- The 301 should take effect before the content loads, so it doesn’t matter what you set here.
- If the content did load and the 301 happened afterwards, I’m not sure how Google would interpret that signal: Don’t index this page? Don’t index the page it redirects to?
So, I don’t tick it.
#2. Check all the links
Once again, we crawl the entire website using Screaming Frog, for example.
The idea is to look for any remaining links to the old website or any links using HTTP instead of HTTPS on the new domain.
This can happen if an absolute URL was entered manually.
That completes the work on the website itself. Now we need to update the linked services.
#3. Changes in Google Ads
If you’re running campaigns, the ideal is to pause them for as little time as possible.
So, once the new website is operational, you have two options:
- Create a new account for the new brand and complete the entire setup.
- Reuse the existing one, changing whatever is necessary.
The first option means more work, but in return you may be able to claim the €400 advertising credit Google offers to new accounts again.
With the second option, even though you don’t have to rebuild everything, there are still quite a few things to change:
- Set the new brand, with its name and logo.
- Change the texts. They may no longer fit the required length—that’s what happened to me when I changed the approach from “I” to “we”, which required longer wording.
- Change the landing page URLs so they point to the new domain.
- Change the relevant ad extensions.
- Change the contact details, where applicable.
I don’t think I’ve missed anything.
As you can see, there’s a fair amount of work here. It’s not a completely new setup, but you are rebuilding around 60–70% of it.
Another advantage of using the same account is keeping the historical data in one place, making comparisons easier.

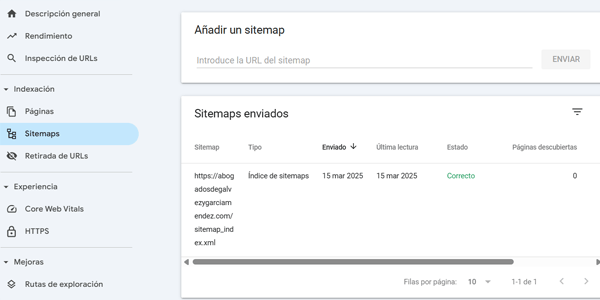
#4. Migrate the domain in Google Search Console
In this case, you need to tell Google about the domain change.
This is done using the Change of Address tool and, obviously, you need access to the project’s GSC account.
The official documentation explains when you should request a migration and when you shouldn’t (not for HTTP to HTTPS, or from www to non-www).
One essential thing: don’t forget to add the new sitemap :
#5. Change the Google Maps listing (formerly Google My Business)
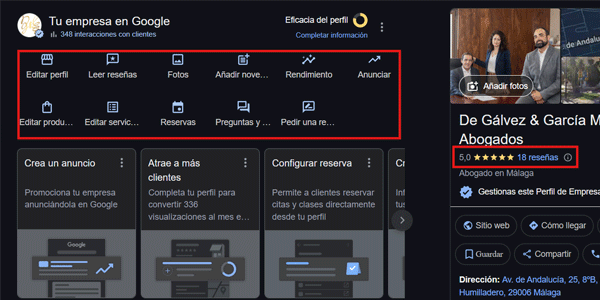
It might seem the same as Google Ads, with the same options of creating a new listing or reusing the existing one.
And yes, it could be.
The problem is that, if you have good reviews, you’d lose them with a new listing. It would also look a little strange to have two different businesses in the same field at the same physical address on the map. So, if you’ve worked on your listing, I recommend updating the relevant fields, including:
- Business name.
- Description.
- URL.
- Contact details.
#6. Update details in other directories
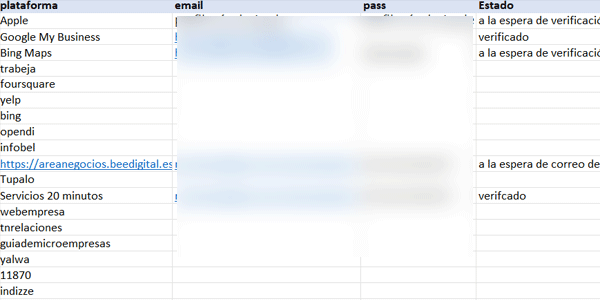
Bing Maps, Apple Maps, Foursquare, TripAdvisor, El Tenedor, El Abogado…
If you’ve worked on your online channel and SEO, you’ve probably registered with certain directories besides Google. So you’ll need to roll up your sleeves and update the details everywhere the old website was listed.
Keep track of:
- Directories where changes have been requested.
- Directories where the changes have been completed.
- Directories that are still pending.
That way, it’s easy to continue the work if you do it over several days.
#7. Redirect other websites
This doesn’t apply to every migration, but it does in this case.
It turns out the law firm’s new partner had his own website. It didn’t generate many leads, but it was listed in several places, with links as well.
So, what we do is redirect the entire domain to the partner’s profile URL on the new website, making the process fairly seamless for any client who visits it.
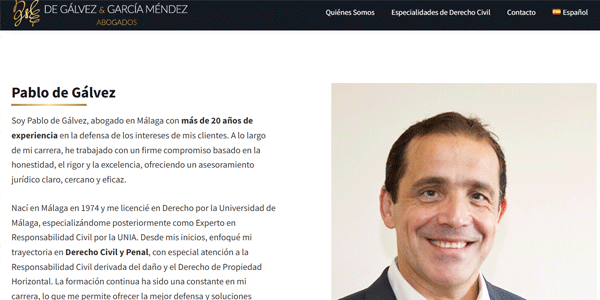
With this, we will have completed the entire migration process..
Of course, we’ll need to monitor and track how things develop:
- Lead generation levels (whether the rate is the same as before and, if not, why).
- Drops in SEO visibility.
- Performance and issues in Google Ads.
- Progress of the updates across directories.
And based on what we observe, make the relevant changes.
But that’s more part of the website’s normal maintenance than the migration itself.
Now, what happens if things don’t go as expected?
How to undo the migration
If that happened, in our project it would be relatively easy, thanks to the backup of the old website that we left on the server when cloning the site (step 2).
We would only need to carry out step 16 of the migration in reverse.
That said, we would restore the old website to its current state. Any content changes made from this point onward on the new website would not appear on the old one, and neither would future updates.
If all of this were too much, it might be worth carrying out the process again, but switching back to the old domain…
Of course, all the steps in the post-migration section would also need to be repeated.
So, even if it’s easy, the ideal outcome is for the new website to work at least as well as the old one.
Conclusions
As you can see, a standard migration like this isn’t especially complex, but it does require knowing what you’re doing, attention to detail, and quite a few hours of work.
I’d say anyone who is reasonably comfortable with WordPress can carry it out without any problems, especially if they’ve already done one.
And if it’s your first, you just need to follow this step-by-step guide—that’s why I published it.
However, if you don’t feel comfortable for any reason, talk to me and we’ll see whether it makes sense for me to do it for you..
If you liked the article, you can receive another one in your inbox within seven days by subscribing here.
You can also visit my YouTube channel, where I publish content and tutorials about every side of digital business. The schedule is no longer weekly, though, and varies a little.
See you around.

Leave a Reply