
In this article, the first in a series I want to devote to the world's most popular email manager, I'll explain how to configure an email account on your own domain (personal or corporate) so you can manage it from Gmail.
It's a relatively simple process, but you need to follow a series of steps until everything is fully functional.
But before starting the tutorial, you may be wondering why you should configure your email this way.
And the truth is there are several reasons.
Advantages of using Gmail with my domain
I'll give you the reasons why I think this little extra setup is worth it, and let's see whether they convince you.
Hosting your emails in Gmail
You may not appreciate the first advantage straight away, but the more you use your own-domain email account, the more useful it will seem.
I'm talking about the space you save by hosting your emails in Gmail rather than on your server.
The thing is, when you buy a standard hosting plan, you usually have limited disk space.
And that disk space is shared by the websites hosted on the server and by your email accounts.
For each project, the server will host a variable number of websites and email accounts, and you may have several, one or none of each.
So, although space is always important, it can become critical in some projects. And this is where having Google host the accounts for free can be a big help (and save money).
What's more, we can even increase the already generous amount of space it gives us for free (15GB) by linking a second account…
Familiarity and ease of management
Even though I'm not a huge fan of the way email is managed in Gmail (I prefer other apps), it's clear that pretty much everyone has used this platform at some point.
And, in general, it is much simpler and has a much more polished UX than the different webmails (platforms for managing email accounts) provided by hosting companies.
Spam filtering
If your website forms send contact messages to the email account linked to your domain (as they normally do), or you display your email on the contact page, you'll know what a pain it is to delete industrial quantities of spam every day.
And, on top of that, they take up disk space on the server.
Gmail is pretty good at filtering many of these emails by itself, without our intervention, so it saves time every day. And, as I said, space too.
Apps
Finally, on top of everything above, Google gives us different ways to manage email: via the web or through its mobile app.
That versatility makes it even more convenient to use in any situation.
Integration with other Google products
If you use your own-domain account for business, you'll normally use a calendar too.
And Google Calendar integrates perfectly with Gmail, so the choice of management stack is pretty obvious.
Add Google Meet for video calls and together they make a productivity trio that's hard to beat.
And, as I said, with free plans that are pretty generous.
It will take you years before you need any kind of paid plan for this
A little point and a full point for Google.
And that's without getting into advanced options such as rules, filters and autoresponders, which are much more powerful in Gmail than in any webmail.
How to create a Gmail account with your own domain
Right, now that you know why I use Gmail as the email manager for my own domains, I'll explain how to do it.
There are several steps, and you'll see that I'll only mention some of them because they're done differently on each hosting provider.
The idea is to focus on configuring Gmail, because that part is the same in every case.
With that cleared up, let's get to it.
Step 0 (optional but recommended): create a new Gmail account
Before starting the whole process, you should know that you absolutely need a Gmail account to link your custom-domain email account to.
So, if you don't want to mix your personal Gmail account with your professional account on your own domain, my recommendation is to create a new Gmail account exclusively for linking it to the custom-domain account we're going to create.
That way we keep things separate: you'll have your personal Gmail and your professional Gmail, which is the one we'll link to your domain account:

And if you have 5 different projects, same idea: I recommend creating a Gmail account for each one.
In my case, I follow this scheme to create Gmail accounts:
- The professional account I'm going to create in the next step is hola@yagogonzalez.com.
- So I create a Gmail account like this: hola.yagogonzalez@gmail.com. The part before the dot ("hola") is what comes before the @ in my professional account, and the part after the dot is the domain without the extension ("yagogonzalez").
Of course, you can adapt the way you create your account to whatever system you want; it has no effect on the setup that follows.
Even if you ignore me and use your personal Gmail because you can't be bothered to create a new account, you can still use this tutorial.
Step 1. Have your own domain and create a linked email account
Right, once you've decided whether to create a new Gmail account or use your personal one, the next step would be to buy a domain, but if you're reading this article I assume you already have one.
So let's move on to the next step: create the email account for work, linked to your domain.
Important: this step will depend on the hosting provider you've hired..
In my case I use Webempresa , so the screenshots are from this hosting provider.
To create an email account with this hosting provider, you just need to access cPanel (the account administration section) and click here:
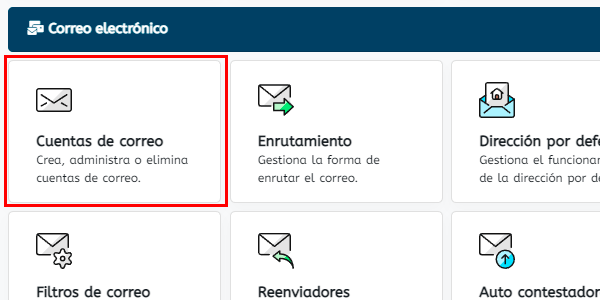
Choose the account, domain and password, then assign however much disk space you think is appropriate:

Once we've created it, we can see the details we'll need to configure Gmail:

In any case, if you don't use Webempresa, this account-creation process works in a similar way with any other hosting provider. For example, in Ionos you do it from here and it's basically the same:

Step 2. Access the domain provider's webmail
Right, once we've created the account, it can be useful to access it via webmail..
And that's because Google will send us an activation code to the email account so we can prove we have access, which means we'll need to be able to open the account.
In Webempresa you can access it in several ways, but since we're already in cPanel, we'll go in from here:

It may ask us for the username and password we just created. We enter them:

Once we're in, it's time to go to the Gmail website.
Step 3. Check mail from other accounts in Gmail
Right, as I mentioned in the first step, to use an email account on your own domain in Gmail, you must have a Gmail account.
Whether it's your personal account that you want to link or the new one you've created (as I recommended), it's time to log in to it..
Once inside, the process is as follows.
We go to Settings > See all settings:

We go into the Accounts and Import section:

Once inside the section, click "Add a mail account", add the account we created with our hosting provider and click "Next":

On the next screen, leave it as it is (POP3):

Here we enter the details our hosting provider gave us. In my case (you can see them in step 1):

A few things here:
- The username is the full account address.
- The password is the one I chose when creating the email account with my hosting provider.
- Server and port: the ones specified by my hosting provider.
- Leave a copy of the message on the server: I disable it. That's what saves space. If I left a copy, it would keep being stored there, and that's not what I want.
- Secure connection: I recommend it.
- Label incoming messages: useful if you're using your personal Gmail account to distinguish emails arriving at your custom-domain account. If it's a new Gmail account, you can disable it.
Once you finish entering the details, click "Next".
In the confirmation window that appears, Google will ask you this:

Leave Yes selected and move on to the next step.
Step 4. Configuring “Send mail as” in Gmail
In this step we only need to add the name of the person assigned to the email account:

Although we can enable the alias option, I prefer to leave it disabled. A matter of taste.
Basically, it merges accounts and inboxes, which matters mainly if you're using your personal Gmail. If the Gmail account is new, it won't have any effect.
In any case, you can find more details about the differences in Google's help link.
As soon as we click "Next", Google will ask for the outgoing server details, which your hosting provider will have supplied. In my case they're these (you can check them against the image in step 1):
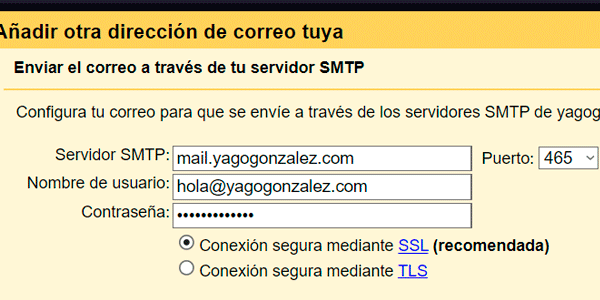
Where:
- SMTP and port are provided by the hosting company.
- Username and password are the ones you chose when creating the custom-domain account.
Click "Next" and, if everything goes as it should, you will see this screen:

Google will have sent an email to our new account with an activation code and/or a link.
We only need to:
- Log in to the account.
- Open the email.
- Copy the code.
- Paste it here.
Or click the activation link. Both options work.
And almost everything will be ready.
That said, depending on whether we previously decided to leave a copy of the emails on the hosting server or not, we can access the webmail or go straight to the new Gmail account to get the code or link.
Step 5 (optional). Choose the default sending account
Although this step is optional, it's highly recommended.
What we do here is "hide" the fact that we are using Gmail from the contacts we interact with by email, so they only see the custom-domain email account.
To do this, we go back to Settings > See all settings > Accounts and Import and set the custom-domain account as default:

If we don't do this, when we send an email this can happen:

F**ck!
What a mess — now we're sending from a Gmail address, right?
So, choose the other one as the default and you'll get this:

Much better like this, with the name and email address we chose in the setup, don't you think?
Step 6. Test that everything works
Although I've already done the relevant tests to show you why choosing the default account matters, in your case you probably haven't done them yet.
So, once we have the whole system set up, it's time to test it.
To do that, we'll send an email from any email account we have to our custom-domain email account (in my case hola@yagogonzalez.com) and check whether we receive it in Gmail, in the account we just linked.
If we receive it, perfect.
If not, as usual we go to Settings > See all settings > Accounts and Import and click here:

By forcing Gmail to check for new incoming emails, the test email should now arrive. If it doesn't, we've done something wrong in the setup.
Right, once we receive the email, click "Reply" and answer it..
We go to the email account from which we sent the original test message and make sure that the reply has arrived..
And that it was sent by our custom-domain account (the default one). Here's the previous image again:
If everything is correct, we can consider the setup complete.
Although we can go one step further…
Step 7 (optional). Add an email signature to messages sent with Gmail
This final touch won't take long and it makes everything look more professional, don't you think?
To add the signature, go to Settings > See all settings > General (careful, this is not the usual section) and scroll down to the Signature section. Click "Create":

Give it whatever name you want and add the text and images you want:
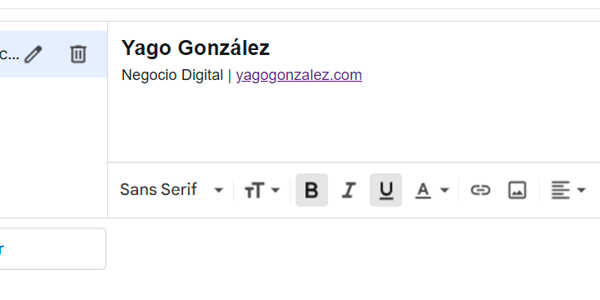
However, this editor may be too simple for more elaborate signatures.
In other words, signatures that require HTML.
And Gmail doesn't let you insert HTML directly into its editor.
But there's a trick for that…
Add an HTML email signature in Gmail
To add HTML code to the signature, follow this process:
- Create an HTML file with our signature using any text editor (I've left a template below).
- Open that file in the browser (there's an image of this step a little further down, after the code).
- Select the content that appears. You can press Control + A on Windows or drag the mouse until all the content in the tab is selected.
- Copy it once it is selected.
- Paste it into the Gmail editing box.
You'll see something like this:

The images may not load correctly in this preview, but if you've entered the correct path, they will when you send the email.
In case you want to use it as a template, this is the HTML from mine:
<table width="350px" border="0" cellpadding="0" cellspacing="0"><tbody><tr><td colspan="2"><div style="height:3px;background-color:rgb(87,87,86);width:350px"> </div></td></tr><tr><td colspan="2"><div style="height:3px;background-color:rgb(255,165,0);width:350px"> </div></td></tr><tr><td><a href="https://yagogonzalez.com/?utm_source=email&utm_medium=email&utm_campaign=firma-email-gmail" title="negocio digital yago gonzalez" target="_blank"><img src="https://yagogonzalez.com/wp-content/uploads/2019/12/logo-yago-gonzalez-firma-mails.png" alt="negocio digital yago gonzalez" style="border:medium none"></a></td><td style="font-family:Arial,Helvetica,sans-serif;font-size:13px;color:rgb(87,87,86);text-align:right">Negocio Digital<br><a href="https://yagogonzalez.com/?utm_source=email&utm_medium=email&utm_campaign=firma-email-gmail" title="negocio digital yago gonzalez" style="font-size:14px;color:rgb(255,165,0)" target="_blank">yagogonzalez.com</a></td></tr><tr></tr><tr><td colspan="2"><div style="height:3px;padding:3px 0px;width:350px"> </div></td></tr><tr><td colspan="2" style="line-height:16px"><small><font face="Arial" size="1" color="#333333">AVISO DE CONFIDENCIALIDAD. Este mensaje y, en su caso, los ficheros anexos que contenga, son confidenciales, especialmente en lo que respecta a información de carácter personal, y se dirige exclusivamente al destinatario referenciado. Si usted no lo es y lo ha recibido por error, o tiene conocimiento del mismo por cualquier motivo, le rogamos nos lo comunique por este medio y proceda a destruirlo o borrarlo, y que en todo caso se abstenga de utilizar, reproducir, alterar, archivar o comunicar a terceros el presente mensaje y ficheros anexos. El emisor no garantiza la integridad, rapidez o seguridad del presente correo, ni se responsabiliza de posibles perjuicios derivados de la captura, incorporaciones de virus o cualesquiera otras manipulaciones efectuadas por terceros.</font></small></td></tr></tbody></table>To use it:
- Copy and paste it into a text editor such as Notepad,, Sublime Text or another plain-text editor, but not Word, WordPad or similar programs.
- Once pasted, edit it with your details. Remember to change:
- Image URL: replace it with your logo's URL, which you'll need to have uploaded to your hosting.
- Name of your service.
- URLs and links to your website.
- Colors.
Once you've done that, save the file with an .html extension and continue with step 2 of the process (open it in the browser). You should see something like this:

Right, once you've pasted the HTML, before finishing the signature setup, you still need to configure these fields.:

When you've finished everything, don't forget to save the changes using the button at the bottom..
Now we send a test email to check that the signature is added:

Finally, yes, we're done configuring our email account.

Before we continue, I think this will interest you
Sign up and get my 66-page guide to the Best Free Digital Tools for:
- Marketing
- Analytics
- UX
- Project management…
Plus, every day in your inbox you'll receive a tip or trick (one of the good ones) to improve your business or digital project..
Disadvantages of creating a Gmail email with your own domain
Although we've mentioned the (many) advantages of configuring your email with Gmail, you should know that I also see a few drawbacks, such as these:
Personally, I've always preferred email management in Outlook. Maybe it's because I started with that program, but both that app and Hotmail always seemed much more convenient to me than Gmail.
Another important point is immediacy: the Gmail folder does not sync immediately with the account, so an email you receive may take a few minutes to appear. There's an easy fix, because from the settings you can force retrieval at any time (as I show you in step 6 when testing).
A disadvantage for some people may be privacy. You know how it is on the internet: when a service is free, you are the product. So, in exchange for charging us nothing, who knows what Google does with the data in our emails.
You also have to consider the possibility of changes to the terms: it wouldn't be the first time Google has changed the terms of a service (the switch from GA3 to GA4). Or simply shut it down: Google Reader, Google Optimize, Universal Analytics are good examples of that. It doesn't look like the same thing will happen with Gmail, but you can never be 100% sure.
The technical setup required which, although we've seen isn't much, may not be worth it for accounts that will receive few emails. Not to mention that if you get stuck on any step, the time needed to get everything ready increases.
Final conclusions
So, after looking at the advantages, the drawbacks and the process of adding your own domain to a Gmail account itself, what do you think?
Is it worth it?
Personally, I think so, because, apart from what we've seen here, in upcoming articles we'll talk about some more advanced possibilities that we haven't covered yet:
- "Virtual" accounts and filters in Gmail.
- Rules in Gmail.
- Create an autoresponder with your own domain in Gmail.
- Get (even) more space for your Gmail account.
- The complete workflow for using your corporate or business email in Gmail like a pro.
In the end, you'll have an essential tool for any business—email—configured exactly the way you want it.

Leave a Reply