
In my last article I explained how to create a business website almost for free, paying only for the domain (from $4 a year).
The last, optional step was to get your business email.
I gave you two options: Cloudflare's own email routing (which only received messages but did not send them) or using Gmail.
But I have found what I think is a better solution:
Use Zoho Mail.
A free mailbox that is ideal for this setup.
It is VERY easy to set up when you know how.
But of course, Zoho hides the option a little because it does not want to be flooded with non-paying customers.
So I am going to explain it so you can have it ready in 5 minutes.
That said, I am going to use Cloudflare for two reasons:
- To continue with the workflow from the other day.
- To take advantage of the fact that the connection between Cloudflare and Zoho sets up the DNS for you without you touching anything.
Cool, right?
Right then, let's get down to it!
Prerequisites
- Have the domain pointing to Cloudflare, as we did the other day.
- The Zoho Forever Free plan is usually available in US/EU/IN and not in every region. If it does not appear when you sign up, use a VPN. You can use a free one such as the one built into the Opera browser or sign up for Proton VPN
To sign up for the free plan, go to Zoho and scroll down until you see this:
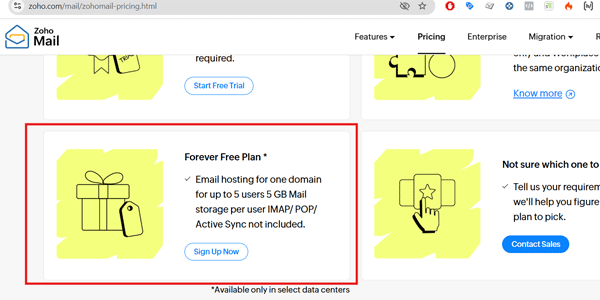
Once you have signed up from there, we can start the setup.
#1. Create the organization and add the domain
Go to Zoho Mail Admin Console → Domains → Add and enter your domain, the one you registered with Cloudflare.
#2. Verify the domain (choose 1 method)
Quick option: One-click with Cloudflare (recommended):
On the verification screen, click “Login to my DNS”, sign in to Cloudflare and Authorize.
Zoho verifies the domain automatically.
You can do it manually, but why would you?
#3. Create users/mailboxes
Under Users, create your email address, for example info@tudominio.com, etc.
I think the free plan allows up to 5 users/mailboxes. In this example, we will create one.
#4. Configure MX, SPF and DKIM in Cloudflare
In Zoho, go to Domains and configure all these DNS records:
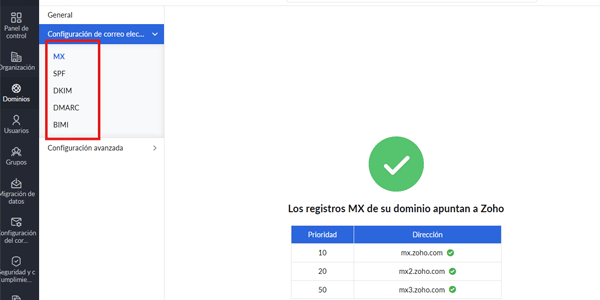
To do this, you only need to click the first one.
It will ask you to connect to Cloudflare; say yes.
Enter your username and password, and that is it.
Add the records shown in the image one by one.
Verification is usually immediate, although some records may take a little longer.
#5. Test
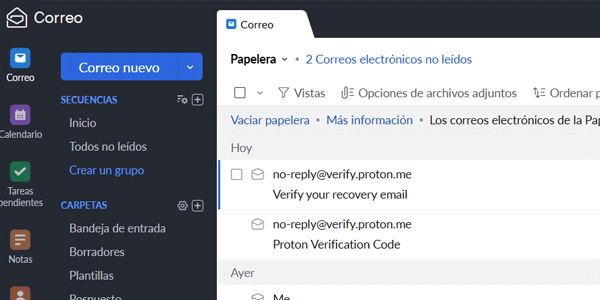
Send yourself an email from an external account (Gmail/Outlook) to tu@tudominio.com and reply from Zoho Webmail, in other words, directly from the website.
One extra tip to avoid problems
Although this should be enough, here is one more tip in case any record returns an error.
Do not use any proxies: in Cloudflare, the MX/TXT records are already set to “DNS only”. For the verification CNAME, explicitly leave it as DNS only.
If the automatic setup created a proxy, change it.
Conclusion
Easy, quick and free.
I wish all services worked like this. It would make my life much easier when creating tutorials.
With this and the workflow from the other day, you can have the website you want, with a professional look, for next to nothing.
It is honestly ridiculous that this workflow is almost free.
But there you go: it is real, as you can see and as I have explained.
If you want more tutorials like this, you know the drill: sign up using the form below the FAQs to receive the articles by email, or follow me on my YouTube channel.
The usual.
Frequently asked questions
Is Zoho Mail really free?
Yes. The “Forever Free” plan allows up to 5 users with 5 GB per mailbox. It is available in data centers in the US, Europe and India. If you do not see the free option when signing up, connect through a VPN in one of those regions.
What is the difference between Cloudflare Email Routing and Zoho Mail?
Cloudflare Email Routing only receives messages (it forwards them to another inbox). Zoho Mail, by contrast, gives you a complete mailbox with sending and receiving, as well as SPF/DKIM authentication and your own domain.
How long does setup take?
Between 5 and 15 minutes if you use automatic verification with Cloudflare. DNS propagation may take a little longer, but it is usually immediate.
Can I use Zoho Mail with Gmail or another email client?
Yes, although IMAP/POP access is not always available on the free plan. You can always use Zoho webmail or connect it to Gmail through an external SMTP service if you enable it.
What happens if Zoho does not offer the free plan in my country?
Use a VPN from the US or Europe when signing up. Zoho selects the data center based on the registration IP address.
How many emails can I send and receive?
The free plan is intended for personal use or micro-businesses. Zoho does not publish exact limits, but in practice it allows several hundred emails per month without problems.
How do I check that the DNS is configured correctly?
In Zoho Mail Admin Console → your domain → Email Configuration → use the buttons Verify MX, Verify SPF and Verify DKIM. If any of them fails, check that the records are set to “DNS only” in Cloudflare.

Leave a Reply