
I’m very much a reader. That’s why I prefer text courses to video courses, whatever the format — Word, PDF or HTML — to be fair.
I’m also very protective of the training I buy. I like having it organized and in the cloud so I can access it however and whenever I want. That’s why, when a course is only available online, I try to download the material and save it on my computer.
That’s how I have a Mega cloud folder with 37GB of training material.
Because if I didn’t do it that way, when I want to revisit an online course I bought years ago — maybe it surprises you that I still go back to courses I bought more than ten years ago and that are still completely relevant — I’d have to remember who I bought it from, the URL, the username and password…
On top of trusting that the course is still stored on that server and hasn’t been deleted or moved to another domain.
Too many variables I don’t control.
Bottom line: I’m more comfortable having the material on my own computer.
So there are several ways to save it on your computer:
- Downloading the HTML page by page.
- Copying the lesson content and pasting it into Word.
- Using extensions that turn it into markdown format.
And a few more that I’ll explain later.
Some cases are simpler and others are more complex. That’s why I’ll explain several solutions and, at the end, the definitive one for the trickiest case, when:
- There are lots of URLs.
- A login is required.
- Links need to point to the downloaded content, not to the current server.
By the way, this applies to courses whose main content is text and images, with links. The final solution is not valid for video courses.
One more note: this solution doesn’t only apply to courses.
A relatively new use case where I apply the same thing is when I want to pass documentation on whatever topic to an AI like NotebookLM and ask it questions directly. This is much more convenient than digging through URLs yourself looking for whatever you need.
If you’ve tried browsing the Google Analytics developer documentation or the Google Cloud documentation, you’ll know what I mean.
The main problems: many lessons, login and links
Courses are usually set up as a collection of online lessons. Each lesson has its own URL, more or less with this structure:
https://www.ejemplo.com/view/courses/nombre-del-curso/seccion/leccion
The platform usually shows a side index with the lessons, letting you move between them.
My goal is to get something identical locally:
curso/
├ index.html
├ 01-introduccion.html
├ 02-que-es-la-herramienta.html
├ 03-casos-de-uso.html
└ ...
Or, better still, a single HTML file with the whole course, something like curso-local.html.
With an internal index, anchor links that let me navigate easily and all the lesson content one after another, as if it were a PDF.
Below are the possible solutions.
Options for saving the course on your computer
There are several possibilities, with different levels of complexity and aimed at different situations (more or fewer URLs, whether login is needed, whether you save the images or keep links pointing to the current server…).
I’ll explain them from the most basic to the most complex.
#1. “Save as” from the browser
The first option is the most obvious one:
File > Save As > Webpage, Complete
This downloads the HTML page and a folder with associated resources: CSS, images, scripts, fonts, etc.
The problem is that this method works reasonably well for simple pages with few URLs, but not for large courses. Because, besides the time spent downloading the 80 URLs one by one, there are other complications:
- Internal links still point to the online URL.
- Each page generates its own resource folder.
- The genuinely useful content is very small compared with the total HTML size.
- Local navigation between lessons is not solved (you need later scripts for that).
- There is too much unnecessary content: header, menus, footer, scripts, pixels, styles, chat, external resources, etc.
In other words, technically you could save “the page”, but that didn’t create a useful version of the course.
This method is better for saving simple websites than courses.
#2. SingleFile
You can use an extension like SingleFile, which saves a complete web page inside a single HTML file. At first it looks like a good solution because it avoids the classic resource folder created by the browser.
The result usually looks better, but often it doesn’t solve the problem either.
First, because the generated file can weigh several hundred megabytes because embedded fonts, huge stylesheets and a lot of code that wasn’t part of the course content are saved inside the HTML.
Also, when the content is generated dynamically (a site built with JS frameworks such as VUE or React) the extension cannot capture it.
And on top of that, the same underlying problems as the previous solution remain:
- The links still pointed to the online website.
- A heavy copy of the page was saved.
- No navigable local structure was generated.
- It wasn’t practical to repeat this for 70, 80 or 90 lessons.
So it becomes clear that SingleFile is useful for saving an isolated page, but not for turning an entire course into a clean local version.
#3. Use a Markdown extension
The next option is to use an extension like MarkDownload, designed to convert a web page to Markdown.
The approach makes sense if you want to:
- Extract only the text.
- Remove unnecessary design.
- Generate lightweight files.
- Then merge them into a document or a local HTML file.
The problem is that, for now, the extension is not available in the Chrome Web Store.
There are alternative extensions, but the one I had used before was this one, so I’m explaining the idea and leaving you to investigate similar options yourself.
#4. Console script
The next route is to create a small script from the browser console.
There are two approaches; the first one is:
- Open the course index page.
- Read all the lesson links.
- Run fetch() for each URL.
- Extract the content.
- Generate a single local HTML file.
If you don’t code, ChatGPT can generate the script for you without any trouble.
The good thing is that this lets you automate the process once you’re logged in, but the page’s security policy may well block it.
You can try another approach, also from the console:
- Open a new window.
- Navigate to each lesson as the user would.
- Wait for it to load.
- Read that window’s DOM.
- Extract the content.
The problem you may run into here on dynamic pages is that the browser doesn’t always let you control that window properly, read its content or detect when it has actually loaded.
Neither of the two formulas is a robust solution, but I’m telling you about them because I’ve used them at times and they may help you. Although I’d say you’re better off moving on to the next one.
#6. Tampermonkey
On paper, it is the most complex one, because it requires:
- Installing an extension.
- Generating a script.
- Making it run inside each URL.
But Tampermonkey makes it quite a bit easier, because it lets you automatically load your own script when you visit certain URLs.
Here the browser itself goes into each lesson and the script runs inside the loaded page.
The flow is:
- Index page.
- Tampermonkey collects links.
- It navigates to lesson 1.
- Captures visible content.
- Saves state in localStorage.
- It navigates to lesson 2.
- Captures content.
- …
- Generates final HTML.
This has a much higher chance of always working.
The key is to find the real container of the course content, which you do by inspecting the URL of a lesson to locate which HTML block contained the useful content.
It is usually .main-content or #lesson-content or something like that. It depends on how the course website is laid out.
Once you have detected it, you create a script that does the following:
- Runs only on the course URLs.
- Adds a small floating panel with buttons (optional).
- Collects lesson links from the course index.
- Saves those links in localStorage.
- Automatically navigates through each lesson.
- Waits until #lesson-content exists.
- Clones that block.
- Cleans scripts, styles, buttons, iframes and unnecessary attributes.
- Converts images and links to absolute URLs.
- Saves each captured lesson in localStorage.
- When finished, generates a single downloadable HTML file.
The target result was a file like the one we mentioned in the intro curso-local.html.
By the way, you don’t need to know how to program. Not even HTML. You ask ChatGPT for the script and it does it for you (that’s how I did it).
The important thing is that you know the formula and understand roughly how it works, but the code itself is generated for you by AI.
Step-by-step guide to saving an online course on your computer
This is the step-by-step explanation.
Step 1: install Tampermonkey
The first thing is to install Tampermonkey.
In Chrome, because of current restrictions, it may be necessary:
- Install the extension.
- Go to chrome://extensions/.
- Enable developer mode (switch at the top right).
- Allow user scripts to run.
- Give the extension permission to run on the course website.
This matters because, if Tampermonkey doesn’t have permissions, the panel won’t appear even if the script is correct.
Step 2: create the script
In Tampermonkey:
Dashboard > Create a new script
Delete the initial content and create your script.
Here is the script ChatGPT generated for me, in case you’re a developer and want to take a look, adapt it or test it for your case. Remember to change the course URL:
Step 3: open the online course index page
You need to go to the course’s initial page. If it requires login, log in first and enter the homepage.
Step 4: check that the panel appears
If you use the script I’ve left you, when the course page loads a black panel should appear at the top right with three buttons:
- Test 3
- Todo
- Borrar estado
If it doesn’t appear, you need to check:
- That Tampermonkey is enabled.
- That the script is enabled.
- That @match matches the course URL.
- That the extension has permission for that website.
Step 5: clear state before testing
Before any test, it’s best to press the Borrar estado.
This clears previous captures stored in localStorage.
This is important because old states can remain during testing and generate incomplete or duplicated files.
Step 5: test with 3 lessons
After clearing state, press the Test 3.
You should not launch the scraper for the full course right away.
The script will go through three lessons and download an HTML file.
Open it and check:
- That the index has three lessons.
- That the titles are correct.
- That the content starts with the real lesson text.
- That it doesn’t capture the footer.
- That no empty blocks appear.
Step 6: run the full capture
If the test works, everything is ready. You only need to:
- Open the online index page again.
- Press Borrar estado.
- Press Todo.
- Let the browser navigate by itself.
- Do not close the tab.
- Wait until it downloads the final HTML.
And you will have generated a very nice local HTML file that compresses the whole course into just a few kilobytes.
However, being so lightweight has a catch. The images are linked to the original server; they have not been downloaded to your PC. That means their URL may change at some point or they may be deleted, and then you won’t be able to see them.
You could download them one by one and change the URLs in the HTML, but I think that makes little sense. That’s why, for me, there is a next (optional) step.
Step 7 (optional): move the content to Word
I’m talking about Word, but you can do it in a Google Doc if you prefer. It’s a workflow thing.
In any case, this step is very simple, since you only have to:
- Open the HTML in the browser.
- Select all the content (ctrl+a on Windows).
- Copy it (ctrl+c).
- Paste it (ctrl+v) into a new Word file. It may take a few seconds depending on the size of the course.
- Save it.
Now the images will have been pasted inside the Word file and they’ll be yours.
The downside is that the file will no longer weigh just a few kilobytes, but megabytes. Maybe a lot of them: in my latest course, 181MB. Because it is 136 pages with several screenshots. No joke.
Still, there is a solution to this. Keep reading.
Step 7 (optional): convert the content to PDF
This one is even simpler than the previous one, but there’s a trick. You have to:
- Open the file in Word.
- Click “Save as”.
- Choose PDF.
- In the options that appear, select “Minimum size (online publishing)”:
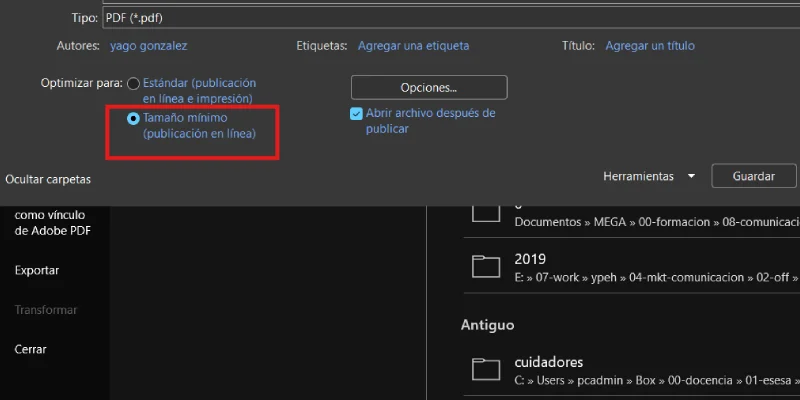
Voilà!
It goes from 181MB to 2MB, not bad at all.
Yes, the images lose a bit of quality, but they more than serve the purpose of the training.
With this, we’ll have a very lightweight PDF with the full course, images and links on our PC, or in our training cloud if we prefer (and you should prefer it).
Limits of this solution
This solution works for HTML courses or documentation whose content is mainly text, images and links.
It does not work for:
- Downloading protected videos.
- Capturing content served through DRM.
- Saving embedded players.
- Bypassing payments or access restrictions.
- Preserving 100% of the platform’s original design.
- Downloading attachments that require additional permissions.
If the course includes embedded videos in Cloudflare Stream, Vimeo, Wistia or other protected players, the script can keep the placeholder or link, but it will not download the video. Those are different things.
Conclusion
If you want or need to save a course locally so you always have it at hand, or full documentation to give to an AI and ask it questions, you have several options.
But if the source requires login and has several dozen or hundreds of URLs, the Tampermonkey system is the best option.
If there are fewer than ten URLs and you don’t want to complicate things, you can try the other solutions I mentioned.
I’ve tested many systems throughout my life — automatic and manual — and none is as fast and automatic as this one.
At least until AI agents do it for you. Free, of course.
No harm in asking.
Frequently asked questions
What is saving an online course on your PC for?
It is for keeping a local copy of a course you already have access to and checking it later without depending on the website, the login, the server or whether the platform still exists.
What formats can you get when saving an online course?
You can save it as HTML, Word or PDF. HTML is lightweight and navigable, Word lets you edit and keep images, and PDF is convenient for storage and consultation.
Does this solution work for any online course?
No. It works well with courses based on text, images and links, but it does not work for downloading protected videos, DRM, embedded players or content without permission.
What is the problem with saving a course page by page?
It is slow, messy and impractical: links still point to the online website, resource folders are generated and there is no clean local navigation.
Does the browser’s “Save as” option work?
It works for simple pages or isolated URLs, but it falls short for large courses with many lessons, login, side index and internal links.
Is SingleFile a good option for saving online courses?
SingleFile can save a complete page in a single HTML file, but it usually does not solve whole courses well because it generates heavy files and does not create a navigable local structure.
What advantage does converting a lesson to Markdown have?
Markdown lets you extract clean, lightweight text and remove unnecessary design, but it depends heavily on the extension used and how the website is built.
Can it be done with a script from the browser console?
Yes, but it doesn’t always work. Many platforms block fetch, external windows or cross-page reads for security reasons, especially if there is login or dynamic content.
Why is Tampermonkey the most robust solution?
Because the script runs inside each real course page, captures the visible content, saves progress and generates a final HTML with all lessons.
Do you need to know programming to use Tampermonkey?
Not necessarily. You can ask ChatGPT for the script, but you do need to know how to test it, adjust the course URL and locate the correct content container.
Which HTML container should be captured in a lesson?
It depends on the platform, but it is usually something like.main-content,#lesson-contentor the block that really contains the lesson text and images.
What should I do if the Tampermonkey panel doesn’t appear?
Check that Tampermonkey is active, that the script is enabled, that the@matchmatches the URL and that the extension has permission on that website.
Why is it better to test with only three lessons first?
Because that lets you check whether it captures the right content, whether the titles come out correctly and whether menus, footers or empty blocks slip in before launching the whole course.
What happens to the images in the generated HTML?
They usually remain linked to the original server, which is why the file is lightweight; but if those images change or disappear, they will stop showing in your local copy.
Why move the HTML to Word?
Because when you copy the HTML and paste it into Word, the images can remain inside the document, making the file heavier but also more independent.
Why convert the Word file to PDF afterwards?
Because PDF can greatly reduce the final file size, especially if you choose the minimum-size option for online publishing.
What is the best final format for keeping a course?
For editing, Word. For lightweight navigation, HTML. For saving, consulting and uploading to a training cloud, usually PDF.
Can I use this system to pass documentation to NotebookLM or another AI?
Yes. You can convert long documentation into HTML, Word or PDF and upload it to an AI to ask questions without reviewing URL by URL.
Does this method download course videos?
No. It can keep links or placeholders for players, but it does not download videos from platforms such as Vimeo, Wistia, Cloudflare Stream or similar ones.
Is it legal to save an online course locally?
It depends on the course terms. It makes sense for personal use with content you already have access to, not to bypass payments, break protections or redistribute material.
Which method should you choose depending on the case?
For a few pages, “Save as” or SingleFile may work; for clean text, Markdown; for large courses with login and many lessons, Tampermonkey.

Leave a Reply